DNTWebsite Management GuideClient operations manual · 14 August 2026
Dots N TotsWordPressNo coding required

Manage the website with confidence.

This is the complete day-to-day guide for adding and updating projects, articles, events, media, reviews and promotions—without changing the website design.

Jump to a section
01

Start safely

Use the WordPress dashboard for content. Keep design, templates, menus and curated pages out of the day-to-day editing workflow.

Golden rule: Draft → Preview → Publish → Check

This sequence prevents nearly every avoidable mistake. A Draft is private. Publish makes an item eligible to appear on the live website immediately.

i
The screenshots are verified temporary examples

They were captured during a controlled end-to-end test. All example items, categories, tags and test uploads were removed afterwards. The staging hostname shown in a few images will change during migration; use the root-relative links below instead of typing that hostname.

The safe editing workflow

  1. Open the correct content area. Use the links in this guide rather than guessing between similarly named WordPress menus.
  2. Create a Draft or open the exact existing item you intend to update. Confirm the title before changing anything.
  3. Complete the practical fields. Some are not technically required by WordPress, but the front end needs them to look complete.
  4. Set images separately. Featured Image and gallery images do different jobs. Uploading a file alone does not attach it to a post.
  5. Preview before publishing. Check desktop and mobile when content includes long titles, several tags or portrait images.
  6. Publish or Update once. Wait for the saved confirmation; repeated clicks are unnecessary.
  7. Verify the public archive and detail page. Use the public links in each section and refresh once if caching delays the change.
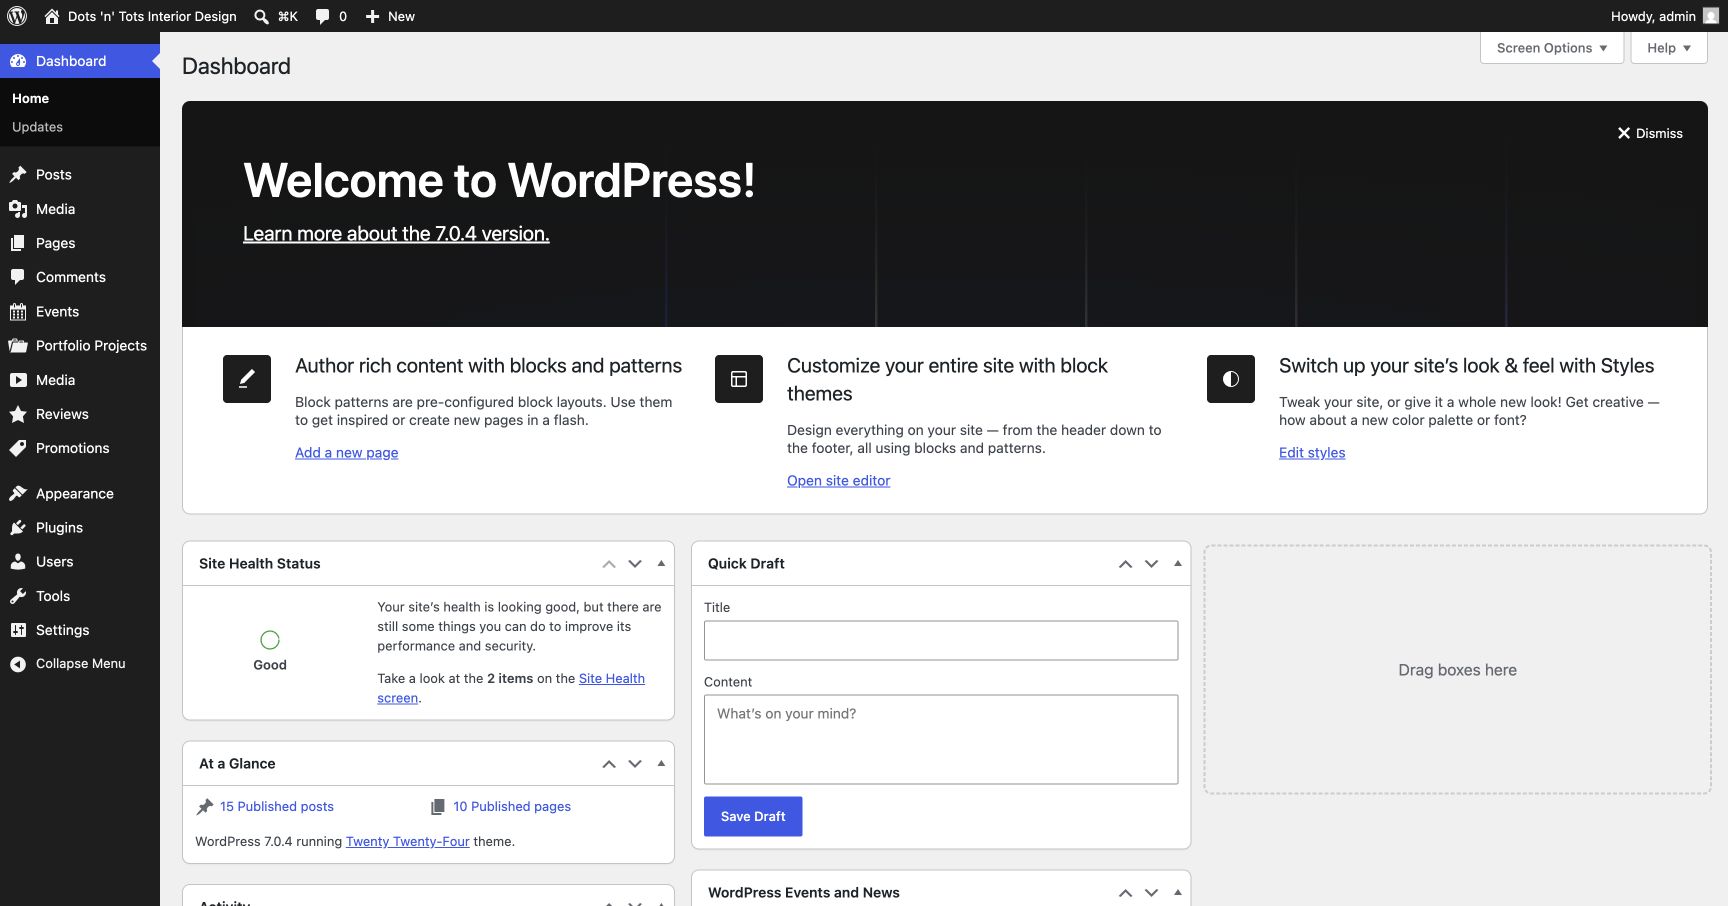
WordPress dashboard showing the Dots N Tots content menus
1Use the named content areas for day-to-day updates; do not edit templates or deployed Pages.
Draft

Private working copy

Not shown in public archives. Use it while gathering content and images.

Publish

Live immediately

Eligible for the public archive, filters and detail page according to that content type.

Trash

Recoverable removal

Removes the public item but keeps it available in Trash for restoration.

Delete permanently

Do not use normally

Irreversible. Never permanently delete shared Media Library files without checking usage.

↑ Back to top
02

Portfolio Projects

Projects power the Portfolio archive and individual project pages. They do not automatically replace the curated project cards on the homepage.

!
Do not bulk-publish the draft projects

The site contains a large legacy/migration draft inventory. Many drafts have incomplete galleries or no Featured Image. Review each one individually.

Add or update a project

  1. Open Portfolio Projects → Add New, then enter the project title using the project address or established naming format.
  2. Set the Featured Image. This becomes the Portfolio card and the hero image on the project page.
  3. Complete the Project Details fields below. Use these fields for visible content; the standard body editor is ignored by the designed project page.
  4. Build the Project Gallery. Select images from the Media Library, reorder them deliberately and save that order.
  5. Save as Draft, Preview, then Publish. Verify the card on Portfolio and the project detail page.
FieldWhat to enterWhere it appears
TagsComma-separated text. Put the broad type first: Residential, Landed or Commercial.All pills on detail; first two on cards; search and Similar Projects.
Housing TypeFor example: 4-Room BTO, Executive Apartment, Condominium.Project facts and Portfolio search.
HomeownersShort description such as “Family of 4” or “Couple”.Project facts and search.
Price RangeFollow the established format, for example “~ $100,000”.Project facts and search.
Subtitle / Pull QuoteOne concise sentence that introduces the design.Main project heading and search description.
Hero DescriptionPlain text. Separate paragraphs with a blank line; do not add HTML.Project story and Portfolio card/search copy.
Project GalleryChoose and order the final project images.Masonry gallery and lightbox.
Correct Portfolio tag format
Residential, Balinese, Modern, Resale
i
Portfolio “Tags” are not WordPress Tags

They are comma-separated words stored on each project. A new word becomes searchable but does not automatically create a visible filter button. Filters are single-select, not additive. Request a developer for a new permanent chip.

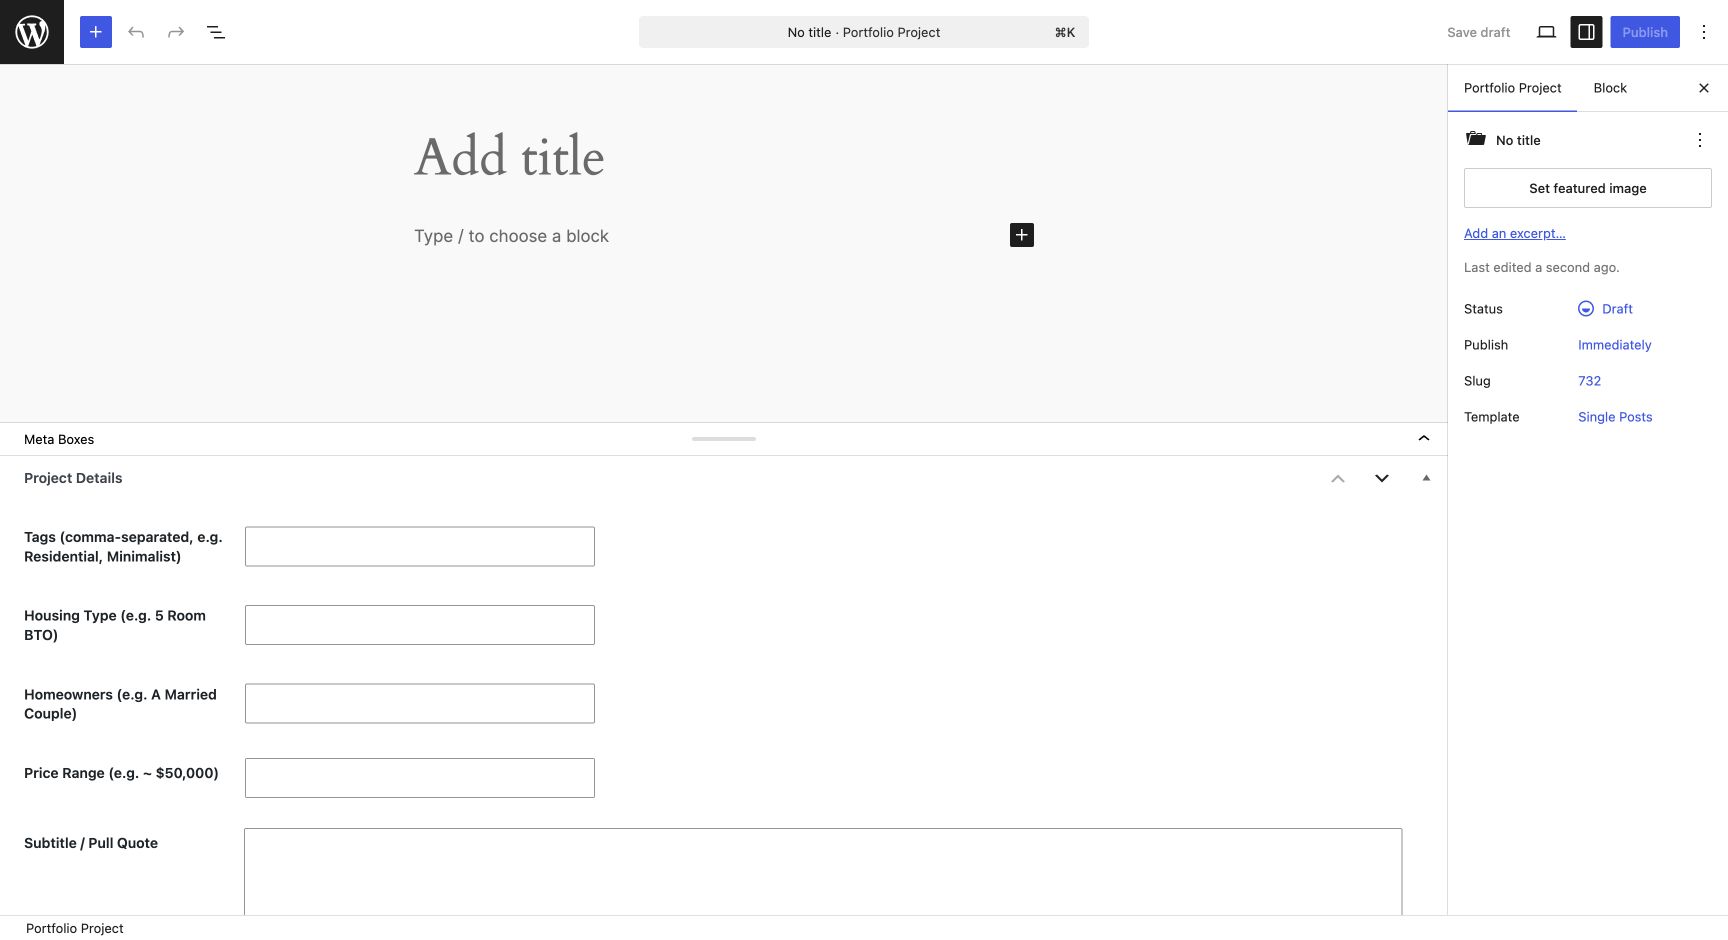
WordPress Portfolio Project editor
2ACreate the title and use the Project Details panel.
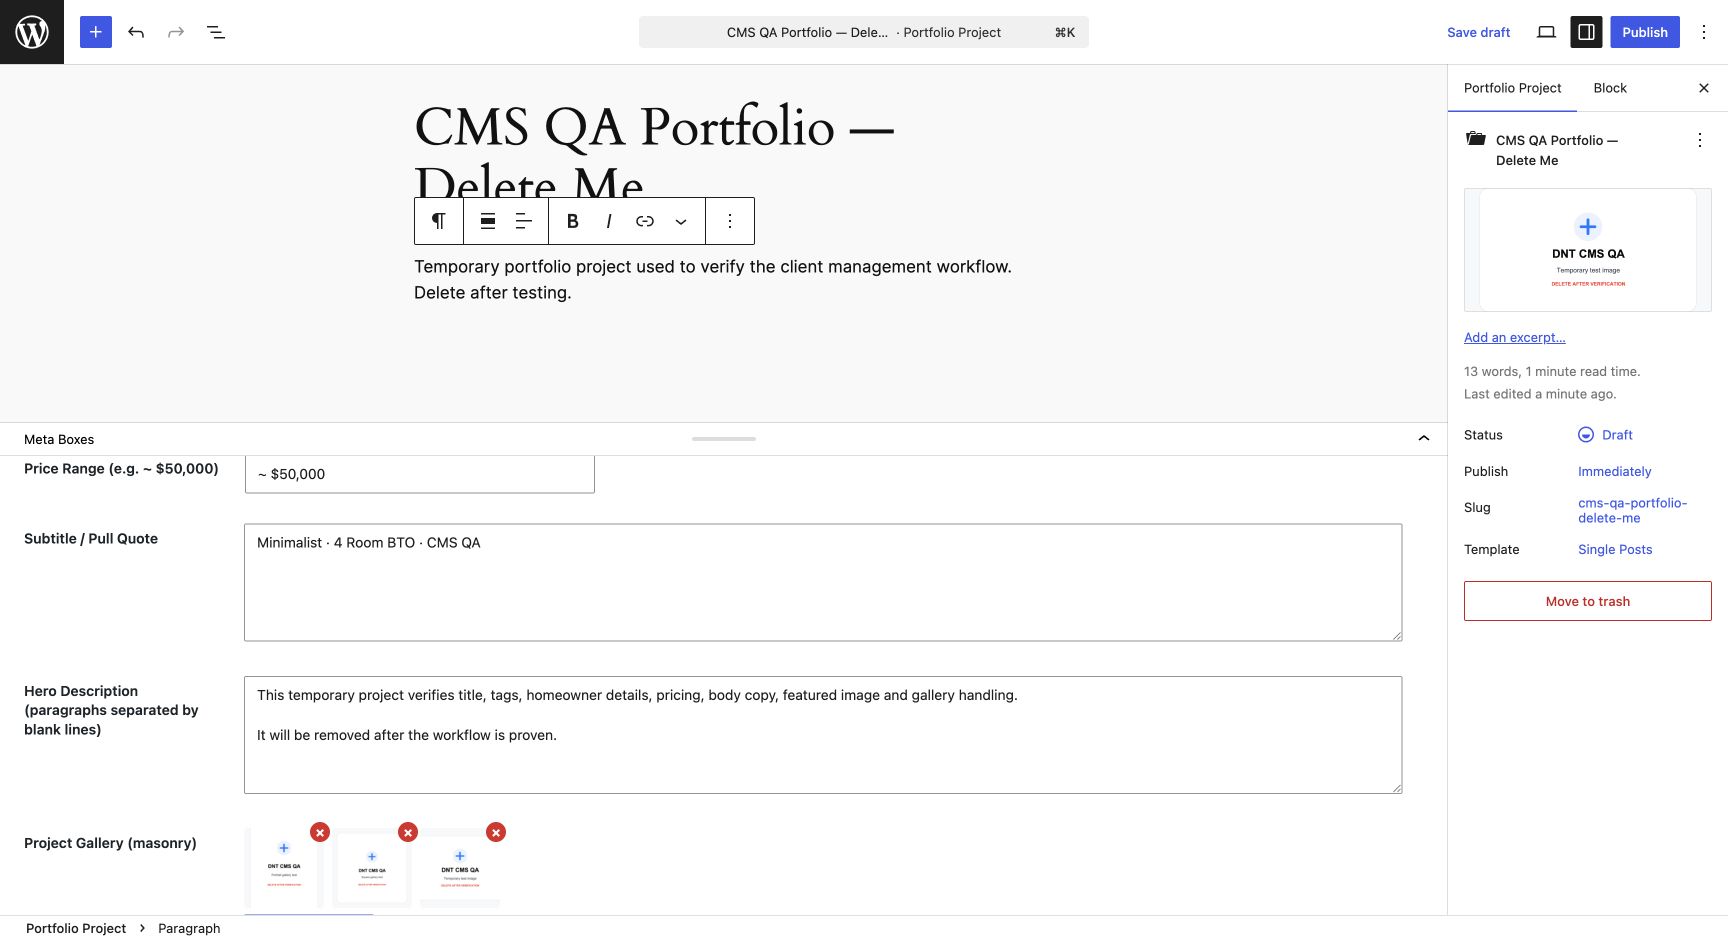
Completed Portfolio fields and ordered project gallery
2BComplete the fields, Featured Image and gallery.
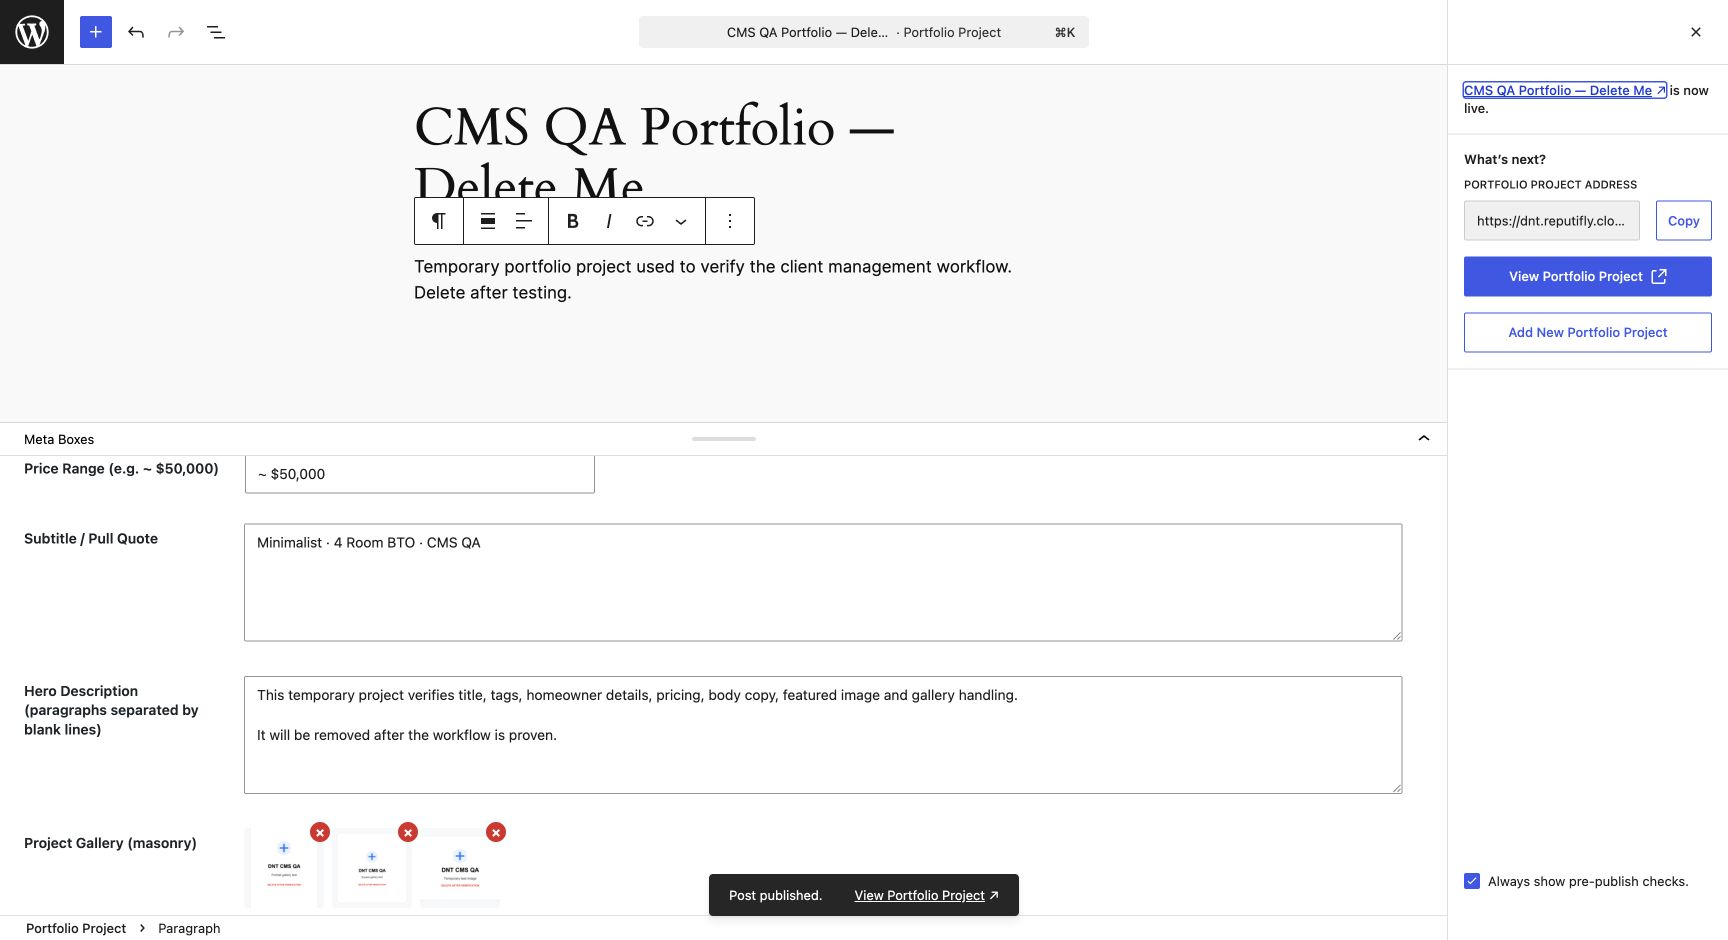
Published Portfolio project confirmation in WordPress
2CWait for confirmation and use the public link.
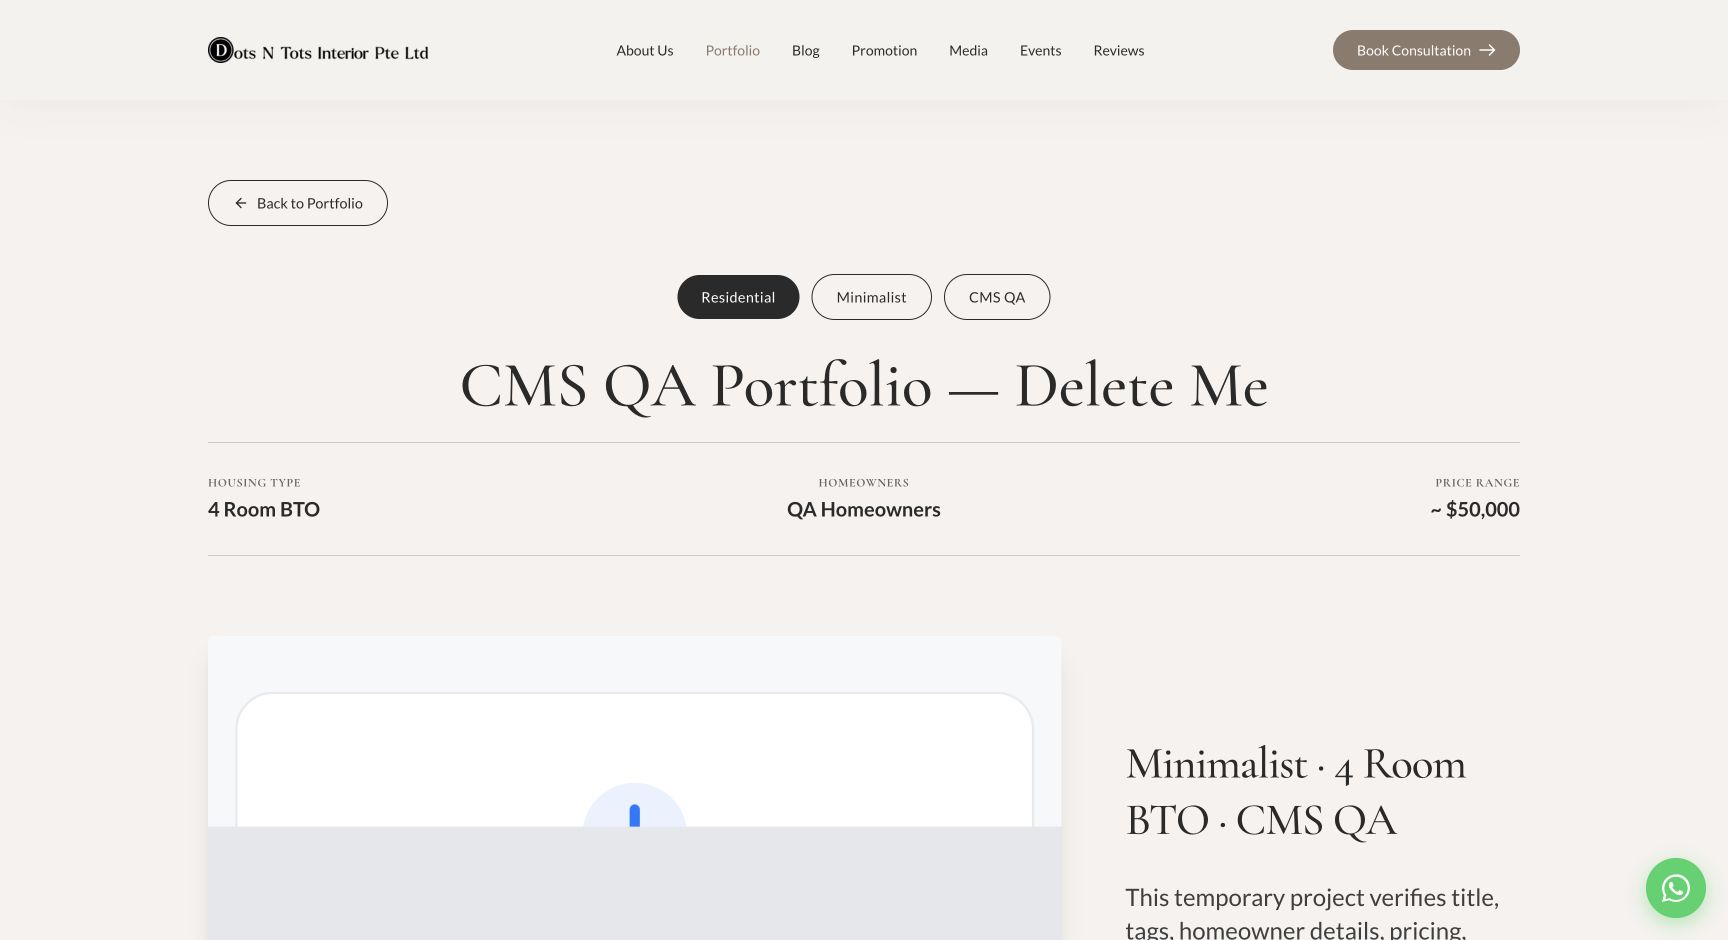
Portfolio project displayed on the public website
2DVerify the live archive card and project page.
How Similar Projects and filters work
  • The first Portfolio tag determines the Similar Projects grouping, so use Residential, Landed or Commercial first.
  • Archive filter chips select one term at a time. Clicking another replaces the previous filter.
  • Visible filter chips are template-managed. Typing a new style into Tags does not add a chip.
  • The archive shows newest publish date first, nine per page. Updating an old project does not move it to the top unless its publish date changes.
↑ Back to top
03

Blog Posts

Posts create the Blog archive, article pages, category archives and editorial content.

Publish an article

  1. Add a clear Title and write the article in the main editor using normal headings and paragraphs.
  2. Set a landscape Featured Image. It appears on the Blog archive, article hero and related articles.
  3. Write a concise manual Excerpt. This controls the card summary and description more predictably than an automatic excerpt.
  4. Select one main Category. The first category drives the visible category and related content, so avoid several competing categories.
  5. Add Tags only if useful for internal organisation or direct tag archives. Tags are not shown as Blog filter chips.
  6. Preview, Publish, then check Blog and the article. The newest published post becomes the Featured Article on page one.
i
Optional designed content blocks

Place each prefix at the beginning of its own plain paragraph. The exact patterns below become designed highlights, takeaways and FAQs.

PrefixUseExample
H: or HIGHLIGHT:Highlighted pull quote.H: Good design begins with how you live.
K:Key Takeaways card. Keep consecutive K: paragraphs together.K: Plan storage before choosing finishes.
F: then Q:FAQ question followed immediately by its answer.F: How long does renovation take?
Q: Timelines vary by scope and approvals.
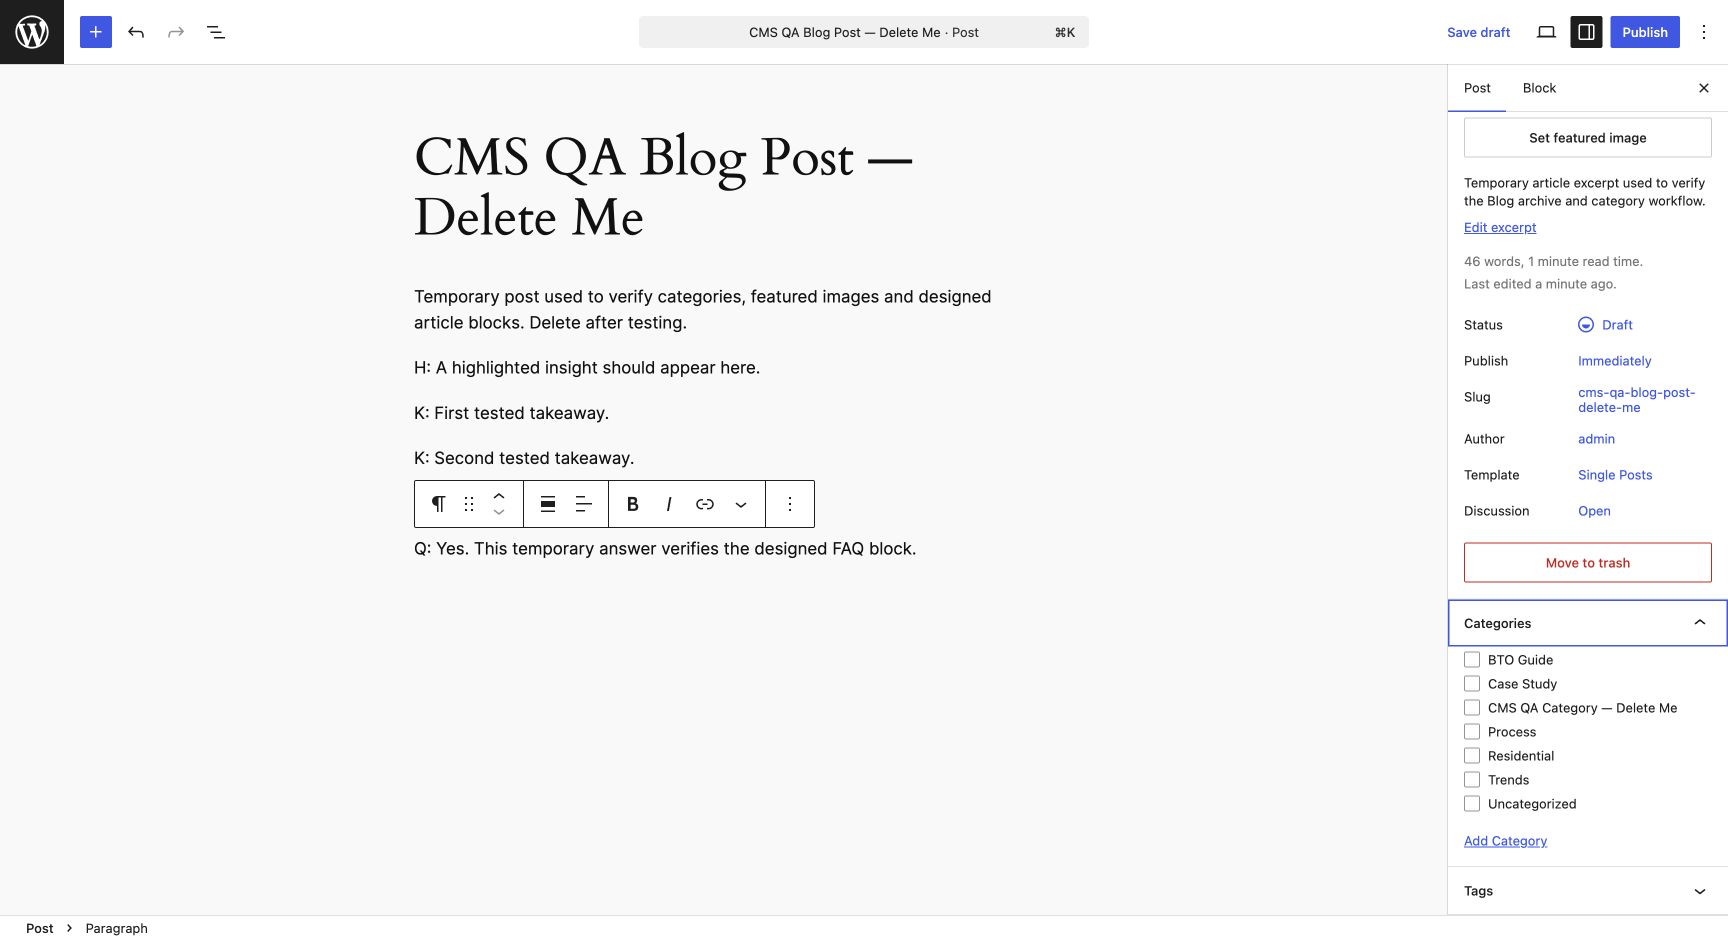
WordPress Blog Post editor with title, content and category controls
3AWrite the post, set Excerpt, Featured Image and one primary Category.
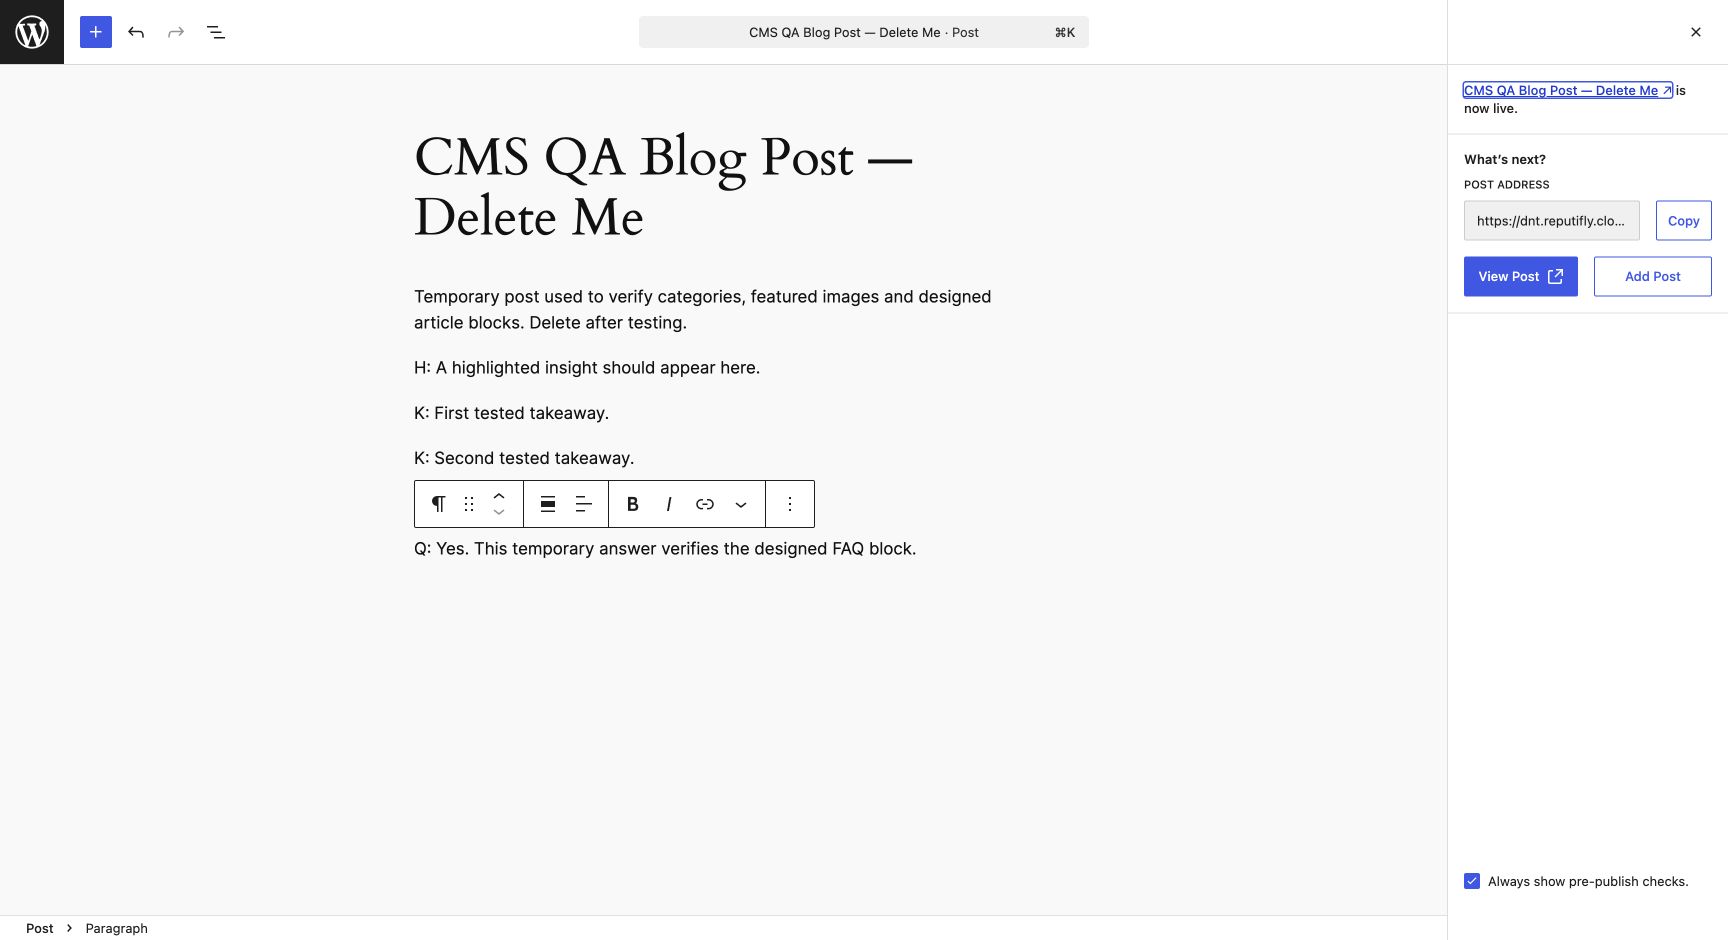
Published Blog Post confirmation in WordPress
3BPublish only after Preview looks complete.
Published article shown on the Dots N Tots website
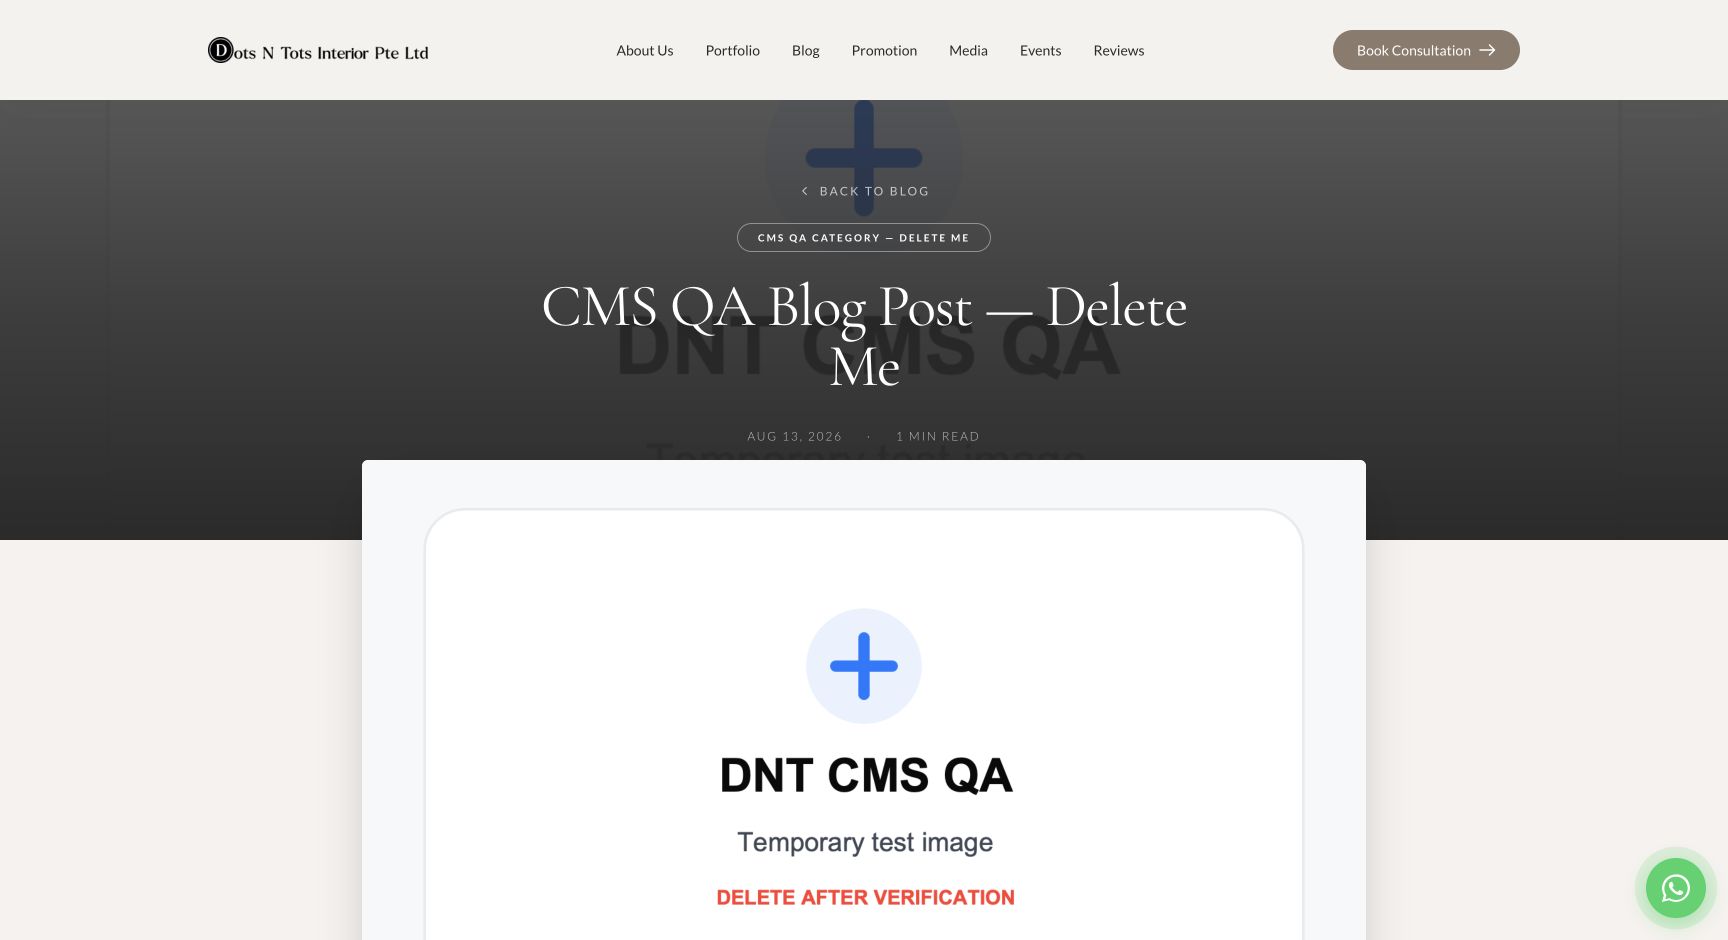
3CConfirm category, hero image, content blocks and related articles publicly.
i
Blog search is connected to published article content

The public search checks article titles and body copy. A search replaces the normal Featured Article with matching results and keeps the search term when moving between result pages. Categories remain the fastest one-tap filters.

↑ Back to top
04

Blog Categories & Tags

Categories create visible Blog filters. Tags organise content and create direct archives, but are not shown in the current Blog design.

Create a Category and connect it to a post

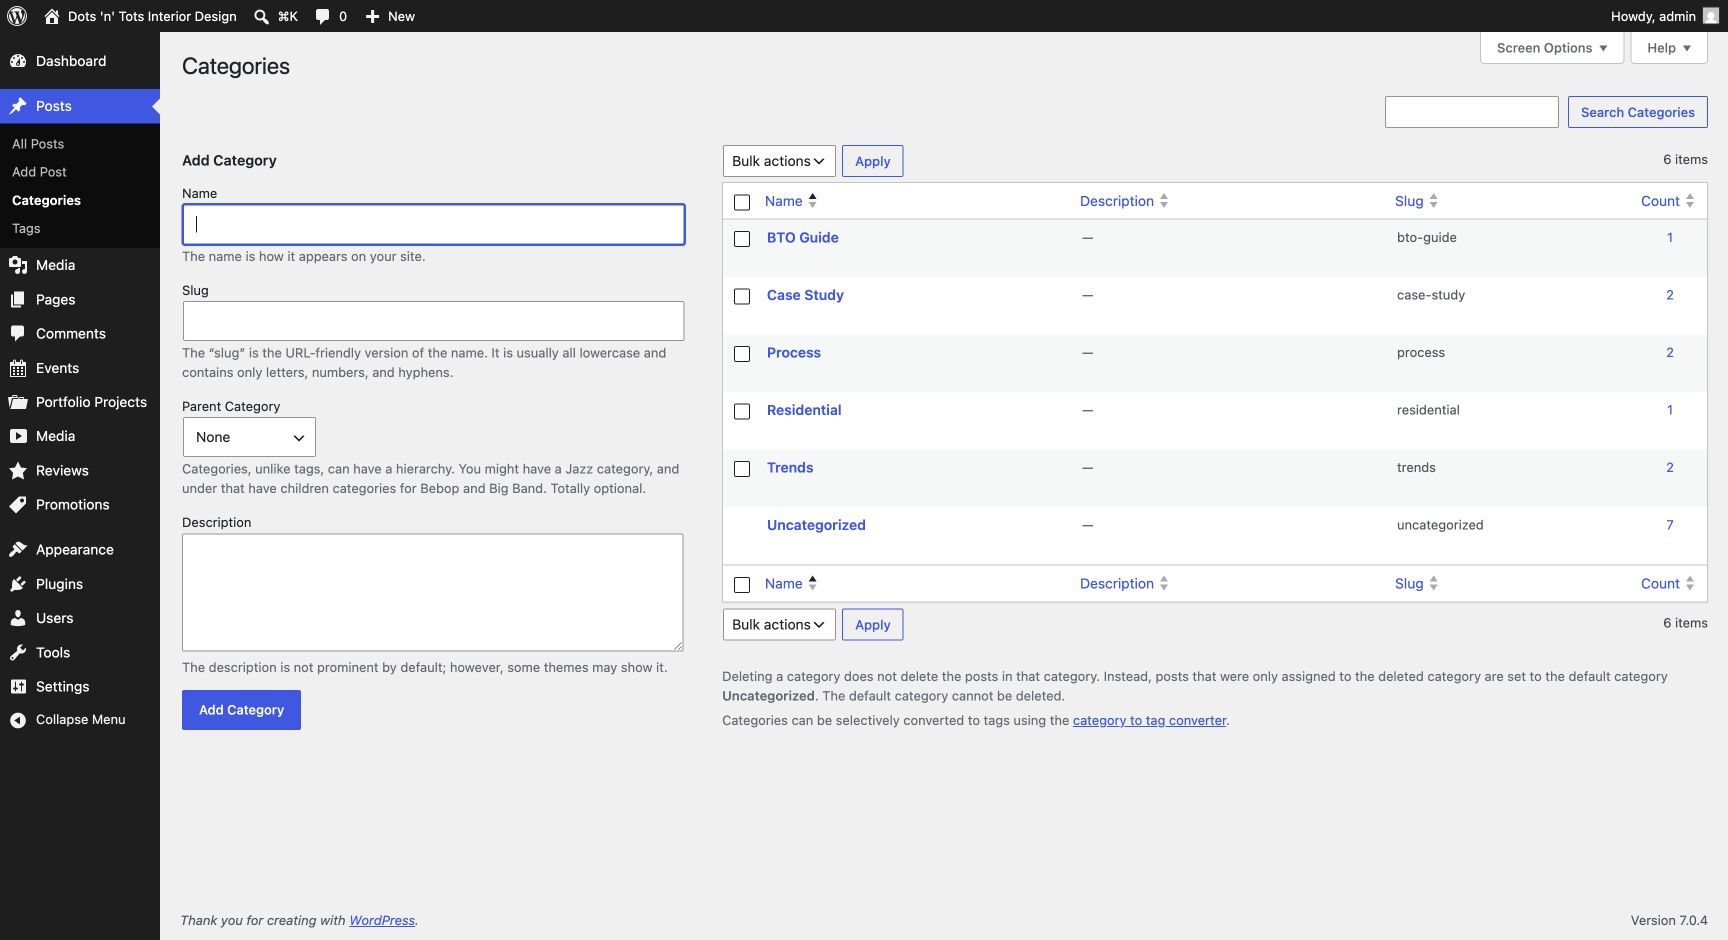
  1. Open Posts → Categories. Enter the Name in title case, for example “Renovation Guides”.
  2. Leave Slug blank for WordPress to create it automatically. If entering one, use short lowercase words separated by hyphens.
  3. Leave Parent Category as None unless you intentionally need a hierarchy, then choose Add New Category.
  4. Open the relevant Blog Post, select the new Category, remove Uncategorized, then Update.
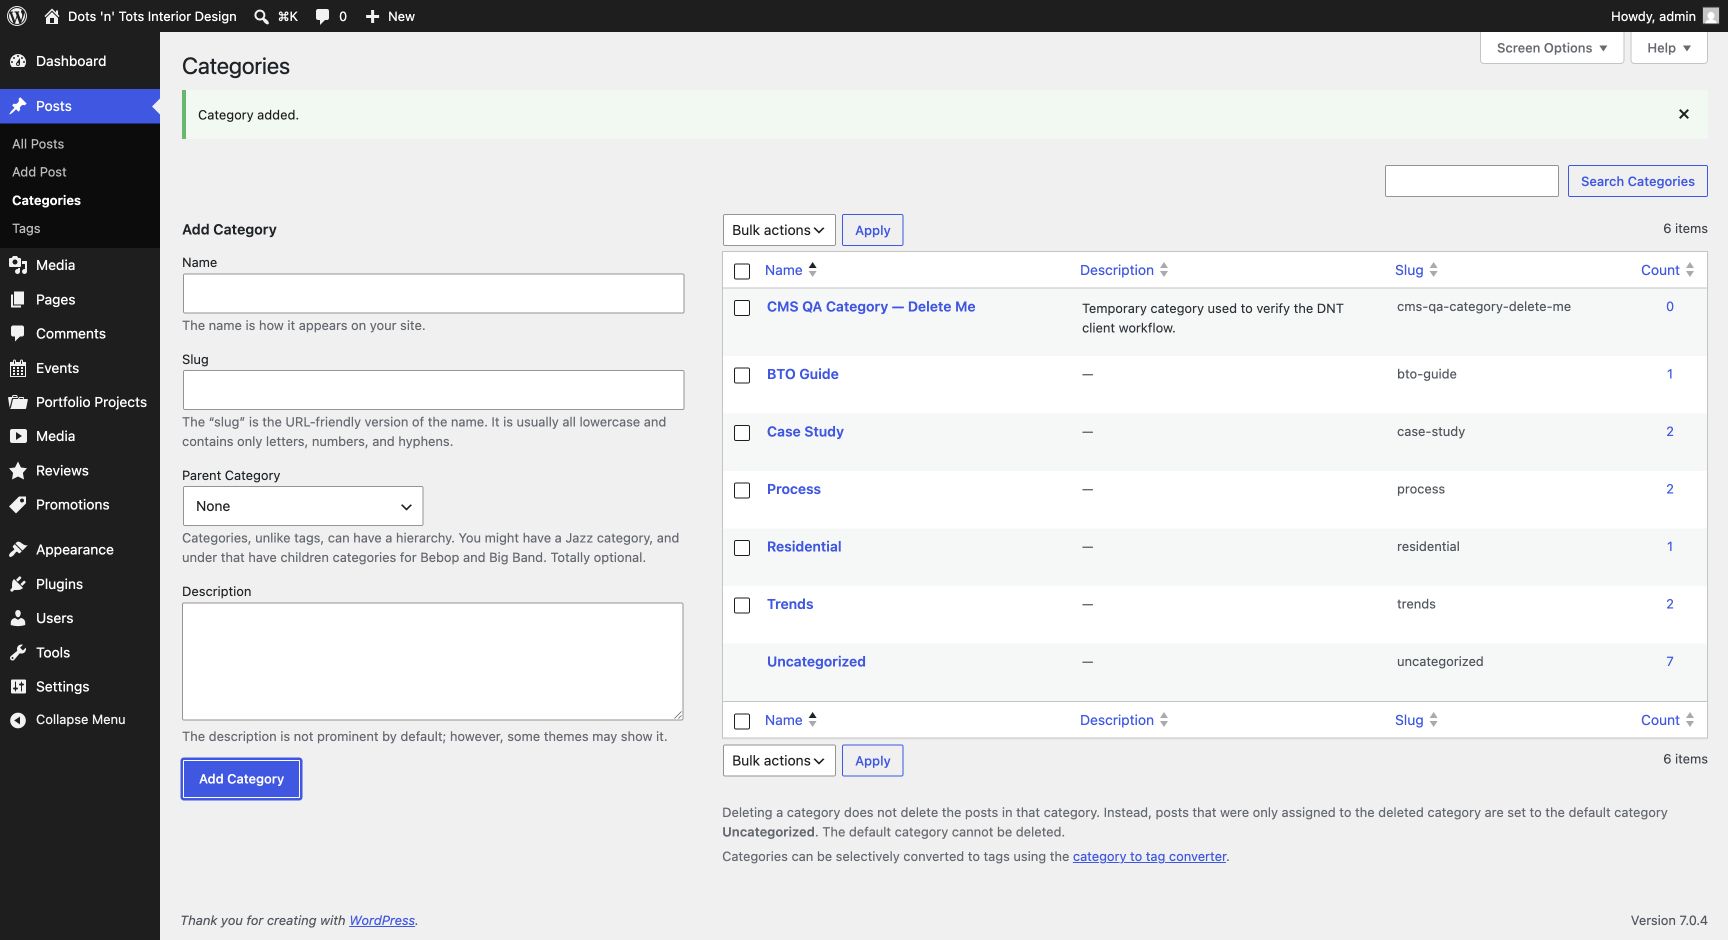
  5. View Blog. A non-empty Category automatically becomes a visible filter and has a public archive at /category/category-slug/.
!
Changing a slug changes its public link

Do not rename established slugs casually. Existing links may need a redirect. Category filters appear only after at least one published post uses them; Uncategorized is intentionally hidden.

WordPress Blog Categories management screen
4AUse Posts → Categories for visible Blog filters.
New Blog Category created in WordPress
4BAssign the Category to a published post before expecting its filter.
When should I use a Tag?

Use a Blog Tag for a cross-cutting topic that does not need a visible Blog filter, such as a neighbourhood, material or campaign. Its archive is /tag/tag-slug/. Do not confuse Blog Tags with the Portfolio project’s comma-separated Tags field.

↑ Back to top
05

Events

The Event Date controls Upcoming versus Past placement. The detail page uses the website’s built-in registration form.

Add or update an Event

  1. Enter the Event Title, body content and a short manual Excerpt for its archive card.
  2. Set the Featured Image. It appears on both the Event card and detail page.
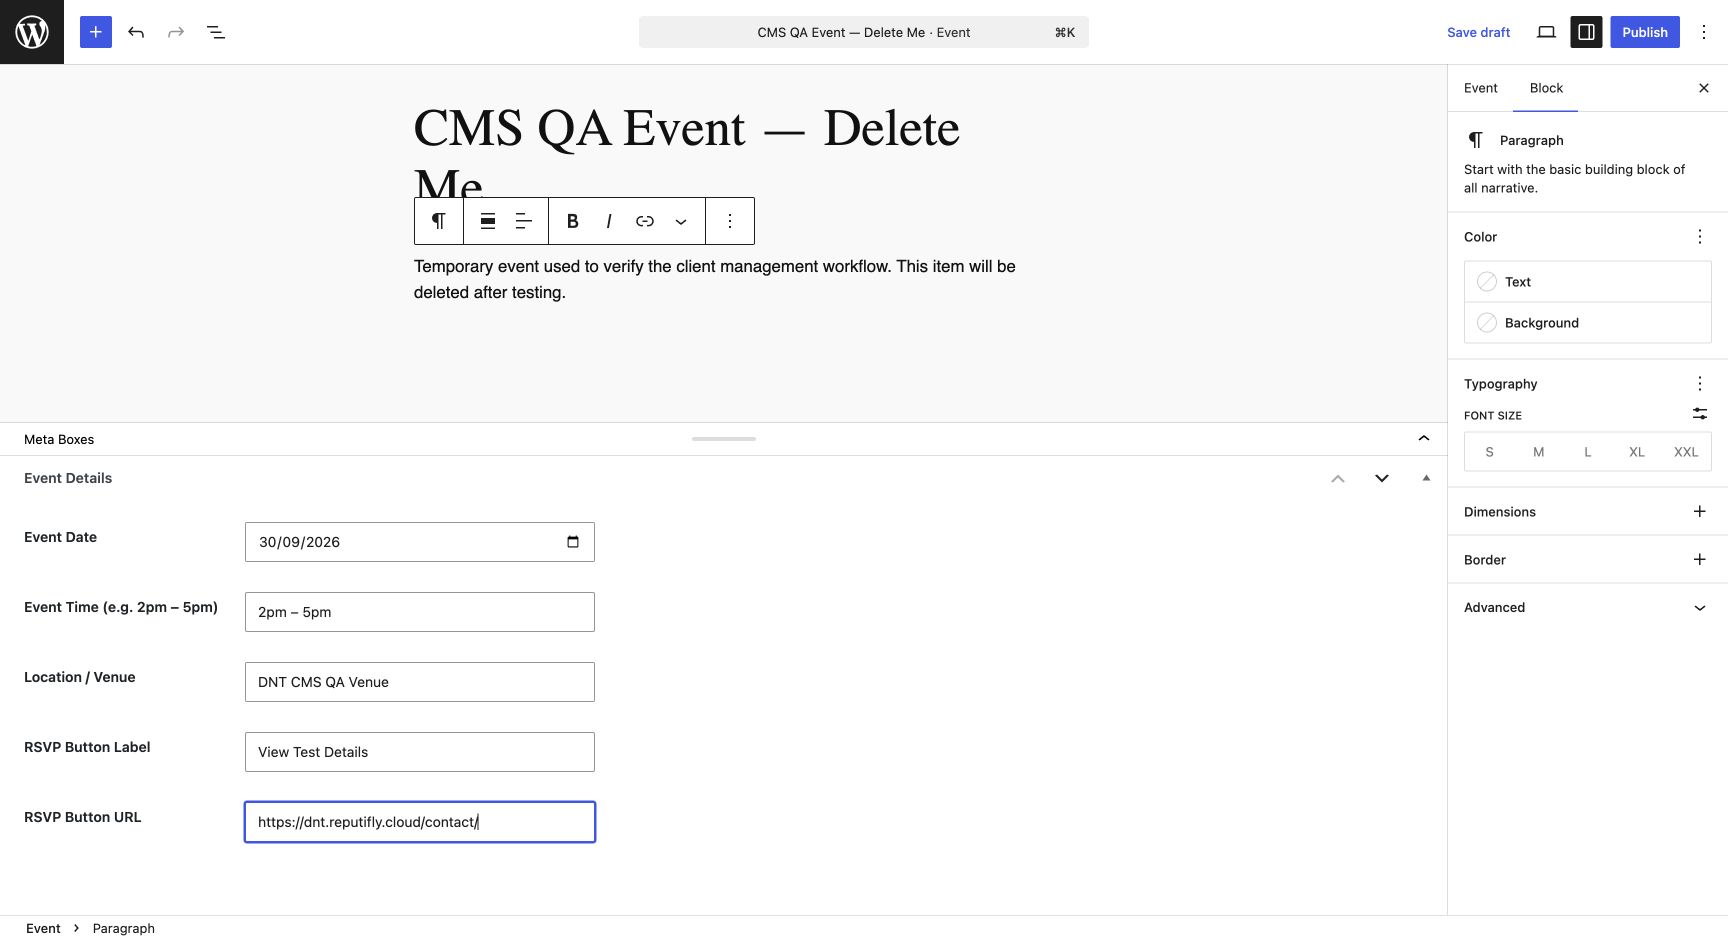
  3. Complete Event Date, Event Time and Location / Venue. Treat Event Date as required because it determines sorting and Upcoming/Past status.
  4. For Location, use a consistent format such as Venue | full address. The detail page can separate these values.
  5. Set the RSVP Button Label if needed. Save as Draft, Preview, Publish, then verify the Events card and detail page.
FieldFront-end behaviorClient guidance
Event DateControls Upcoming/Past and sort order using Singapore time.Always set it. Blank can incorrectly remain Upcoming and display TBA.
Event TimeDisplays on archive and detail.Include AM/PM or a clear time range.
Location / VenueDisplays on archive and detail.Use “Venue | address” consistently.
RSVP Button LabelChanges archive button text.Examples: Register now, View details.
RSVP Button URLSaved but not used by the designed pages.Do not rely on it. The card opens Event detail; detail uses the built-in form.
!
Past Events are not automatically disabled everywhere

Past cards are muted and lose the archive action button, but the detail page can still show its registration form. Unpublish it or request backend help if registration must close.

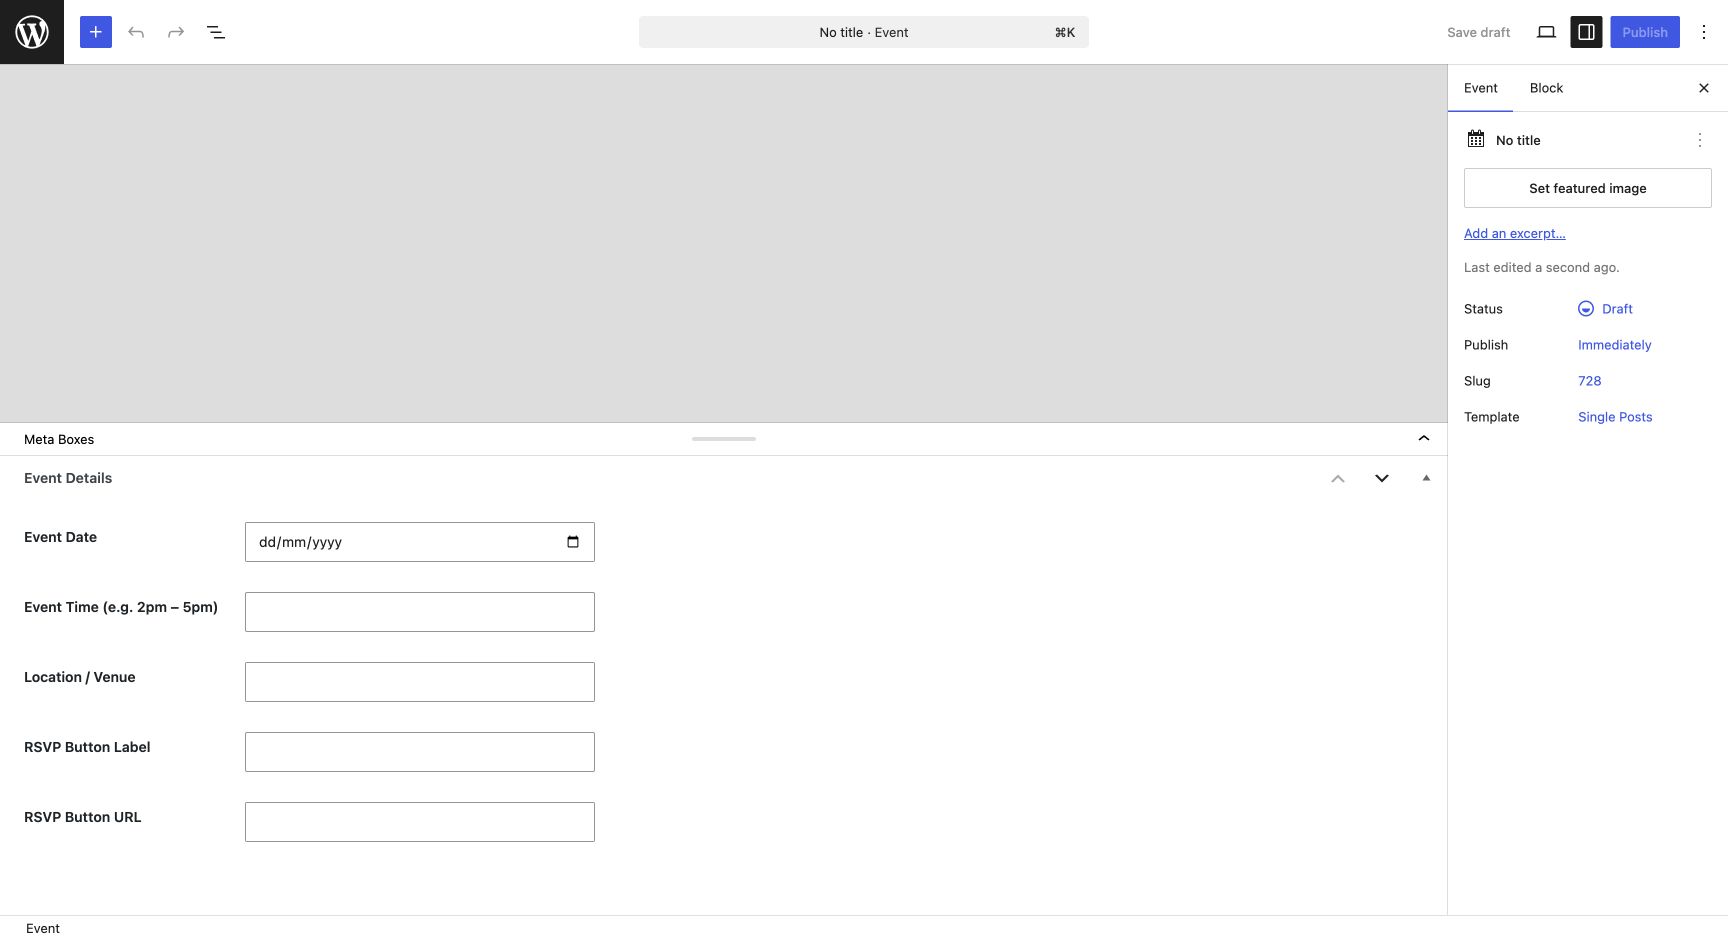
WordPress Event editor
5ABegin with title, copy, Excerpt and Featured Image.
Completed Event Details fields in WordPress
5BSet date, time, venue and button label.
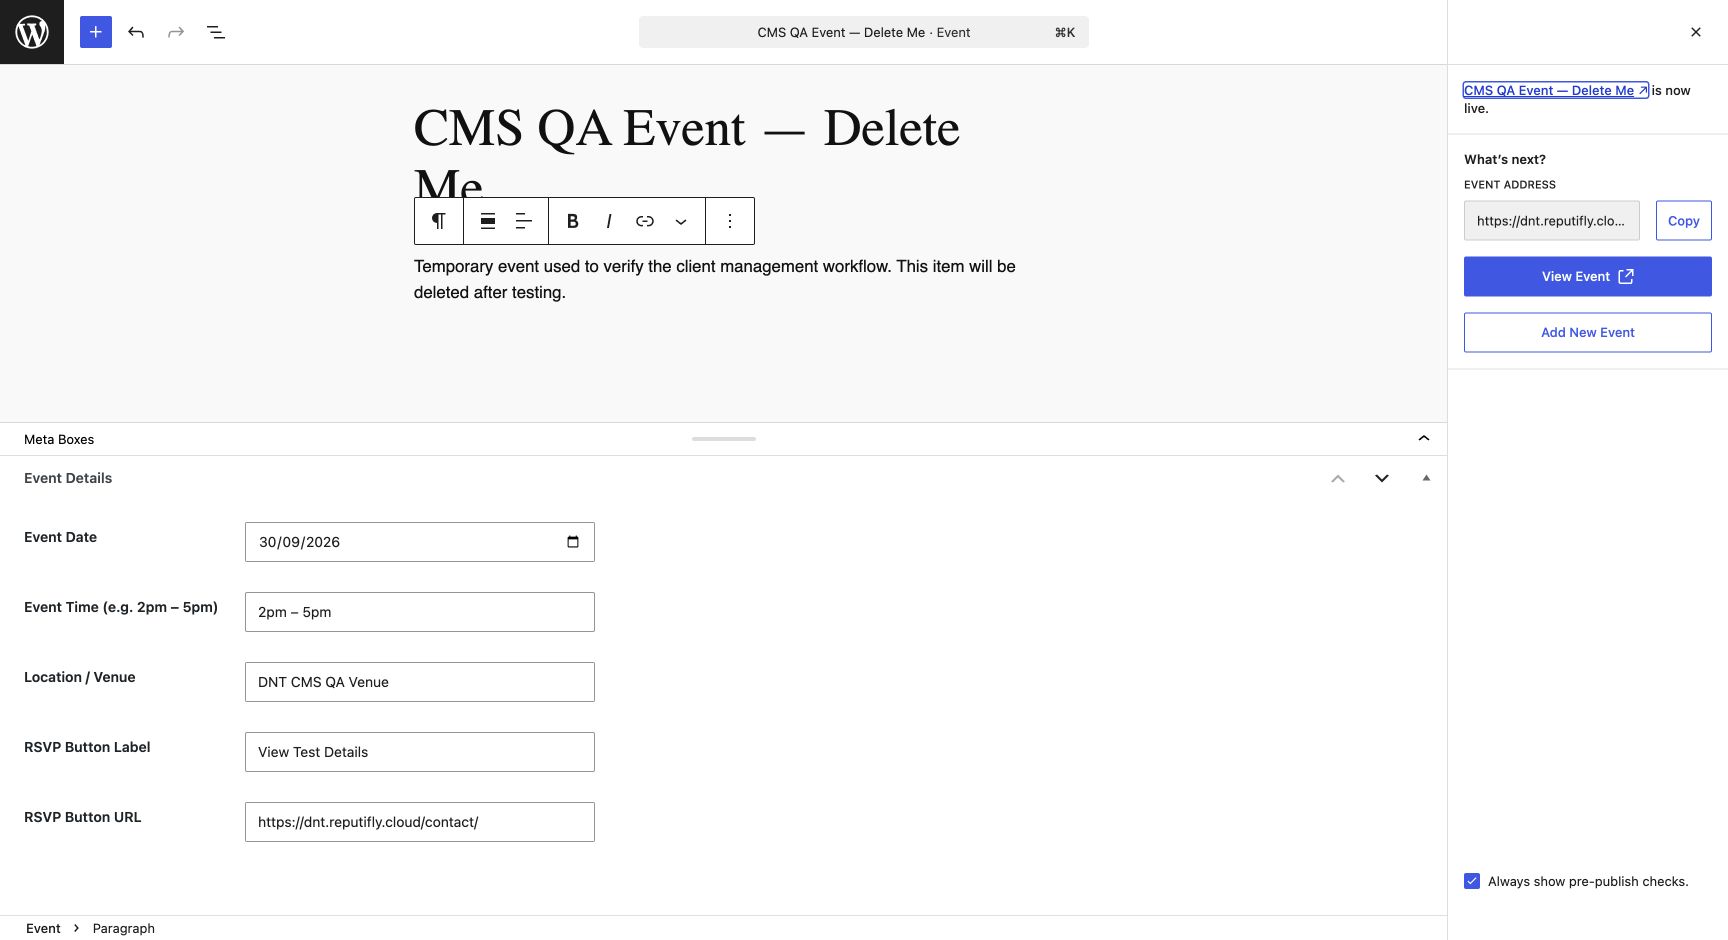
Event published confirmation in WordPress
5CUse the published link to verify the public page.
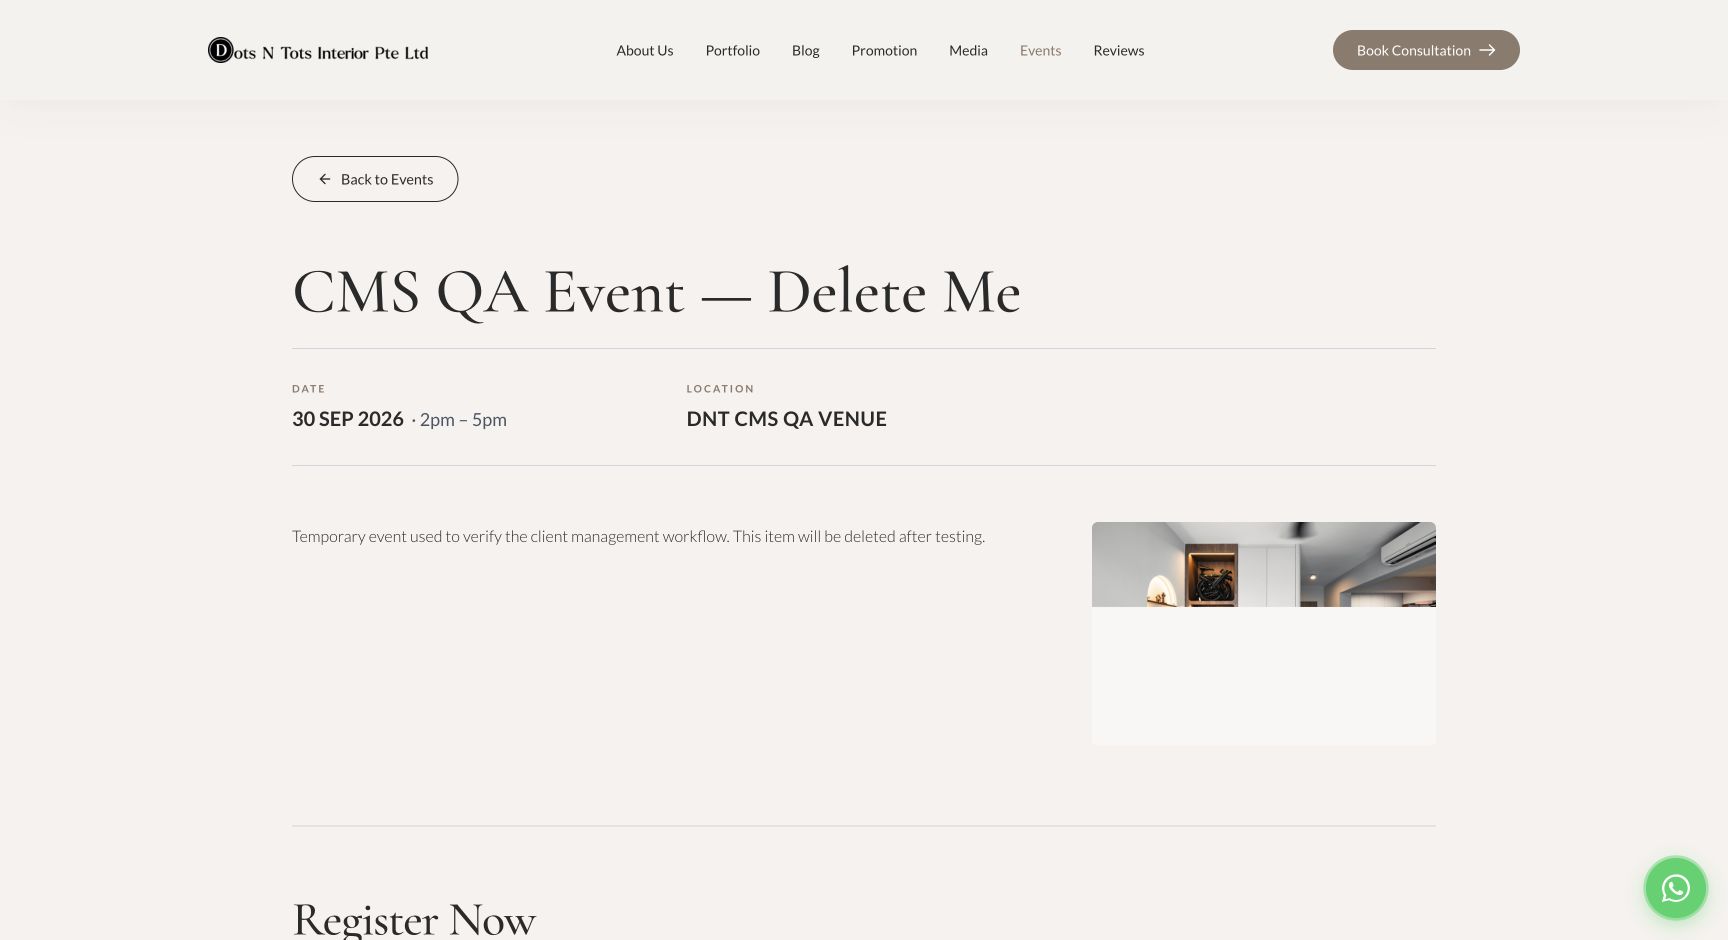
Published Event shown on the public website
5DCheck archive position and registration page.
↑ Back to top
06

Media Items

Use Media Items for YouTube videos, press features and tours on the public Media archive. This is different from WordPress’s image/file Media Library.

i
Two different “Media” areas

Media Items are public video/press/tour cards. Media Library stores uploaded images and files. Check the URL: Media Items use post_type=media; the file library uses upload.php.

Add a Media Item

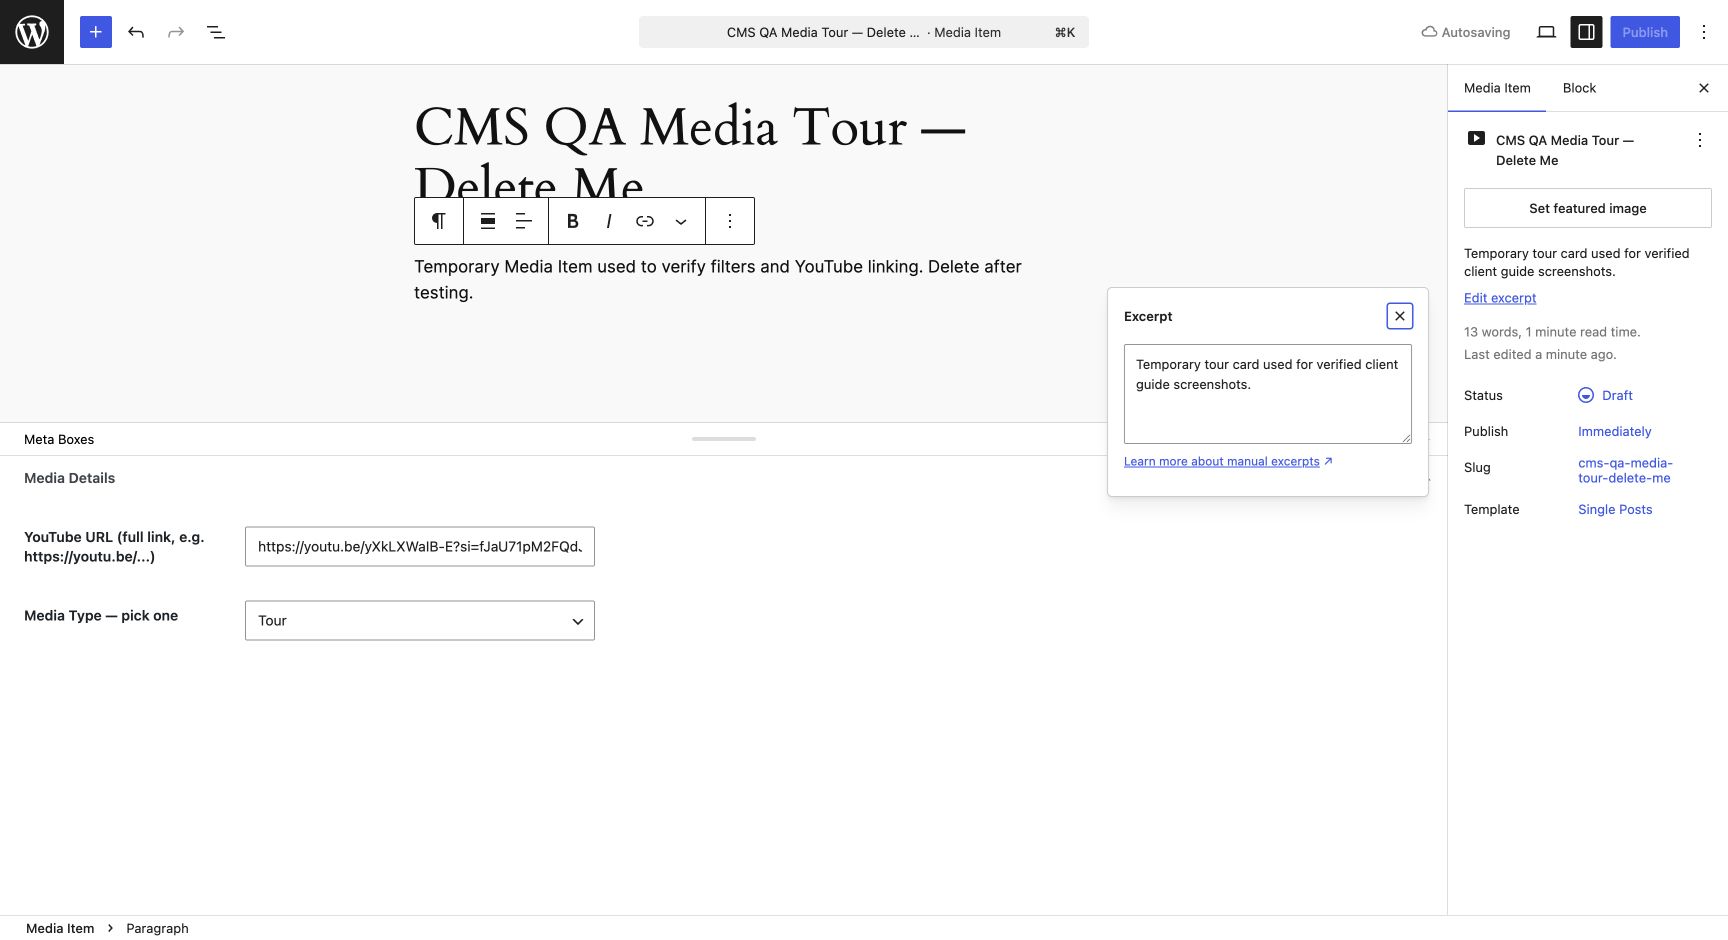
  1. Enter a clear Title and a short manual Excerpt for the Media card description.
  2. Paste the complete working YouTube URL. Test it in a new tab first.
  3. Select the exact Media Type: Video, Press or Tour. This label powers the public filter.
  4. Featured Image is optional and acts only as a fallback if a YouTube thumbnail cannot be generated.
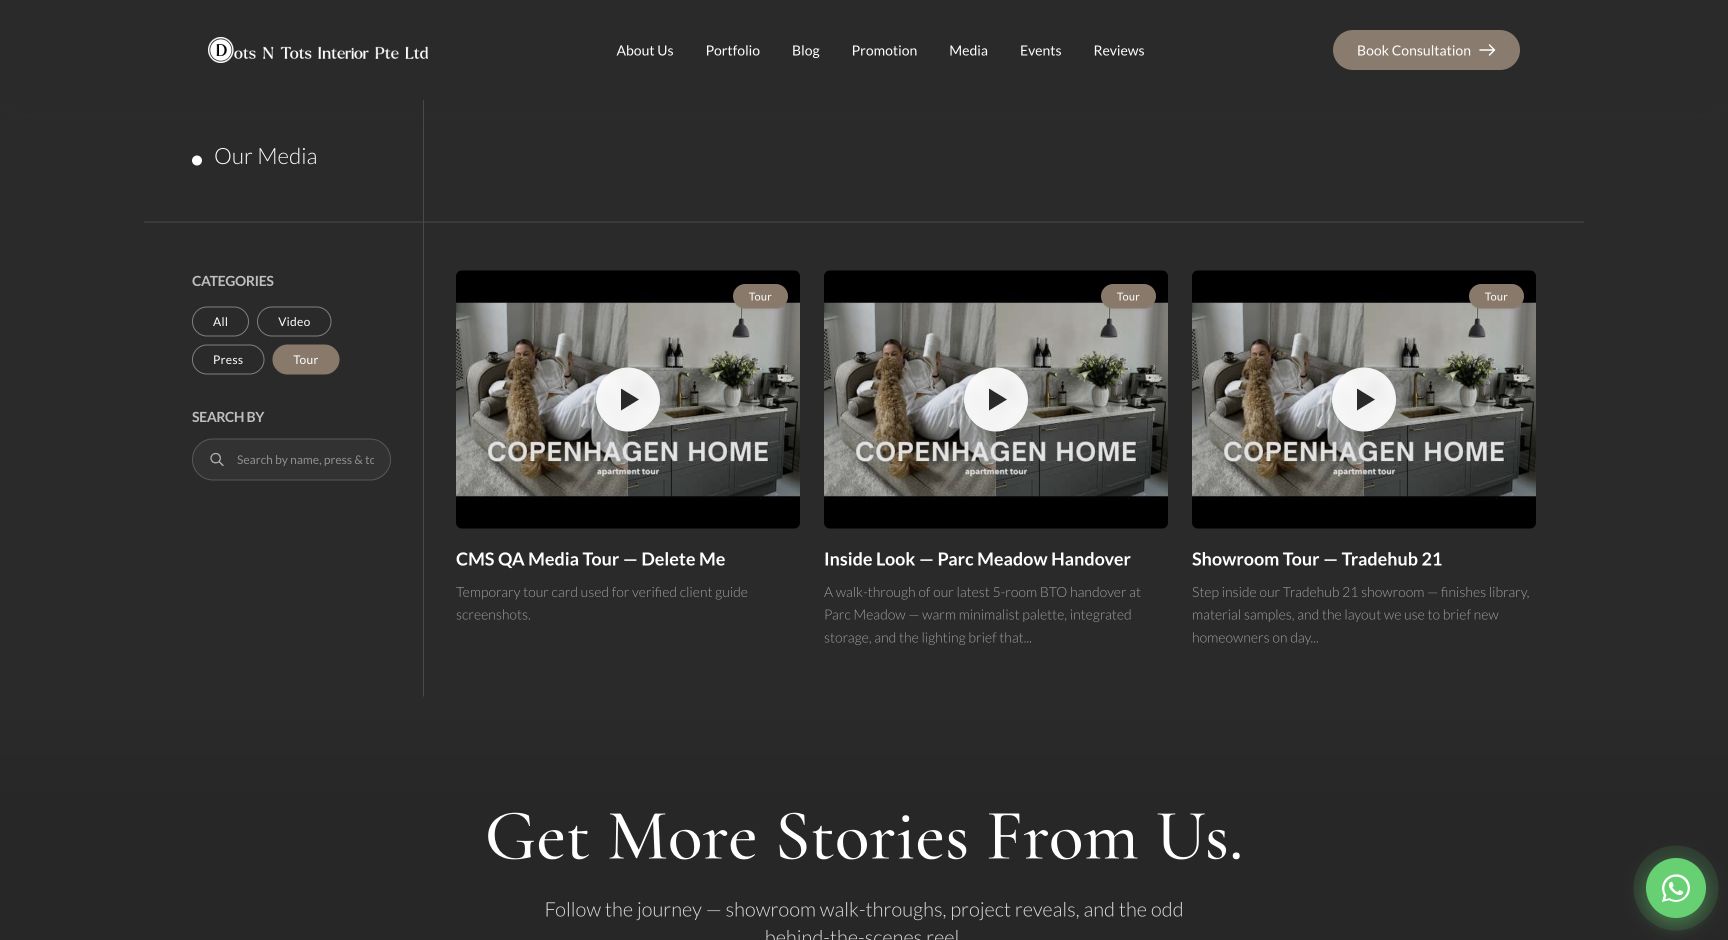
  5. Publish and verify the card on Our Media. Click it to confirm the correct YouTube page opens in a new tab.
×
Never publish without a working YouTube URL

Cards are designed to open the external video. If the URL is blank or invalid, the public single URL safely returns visitors to Our Media instead, so always test the intended video before publishing.

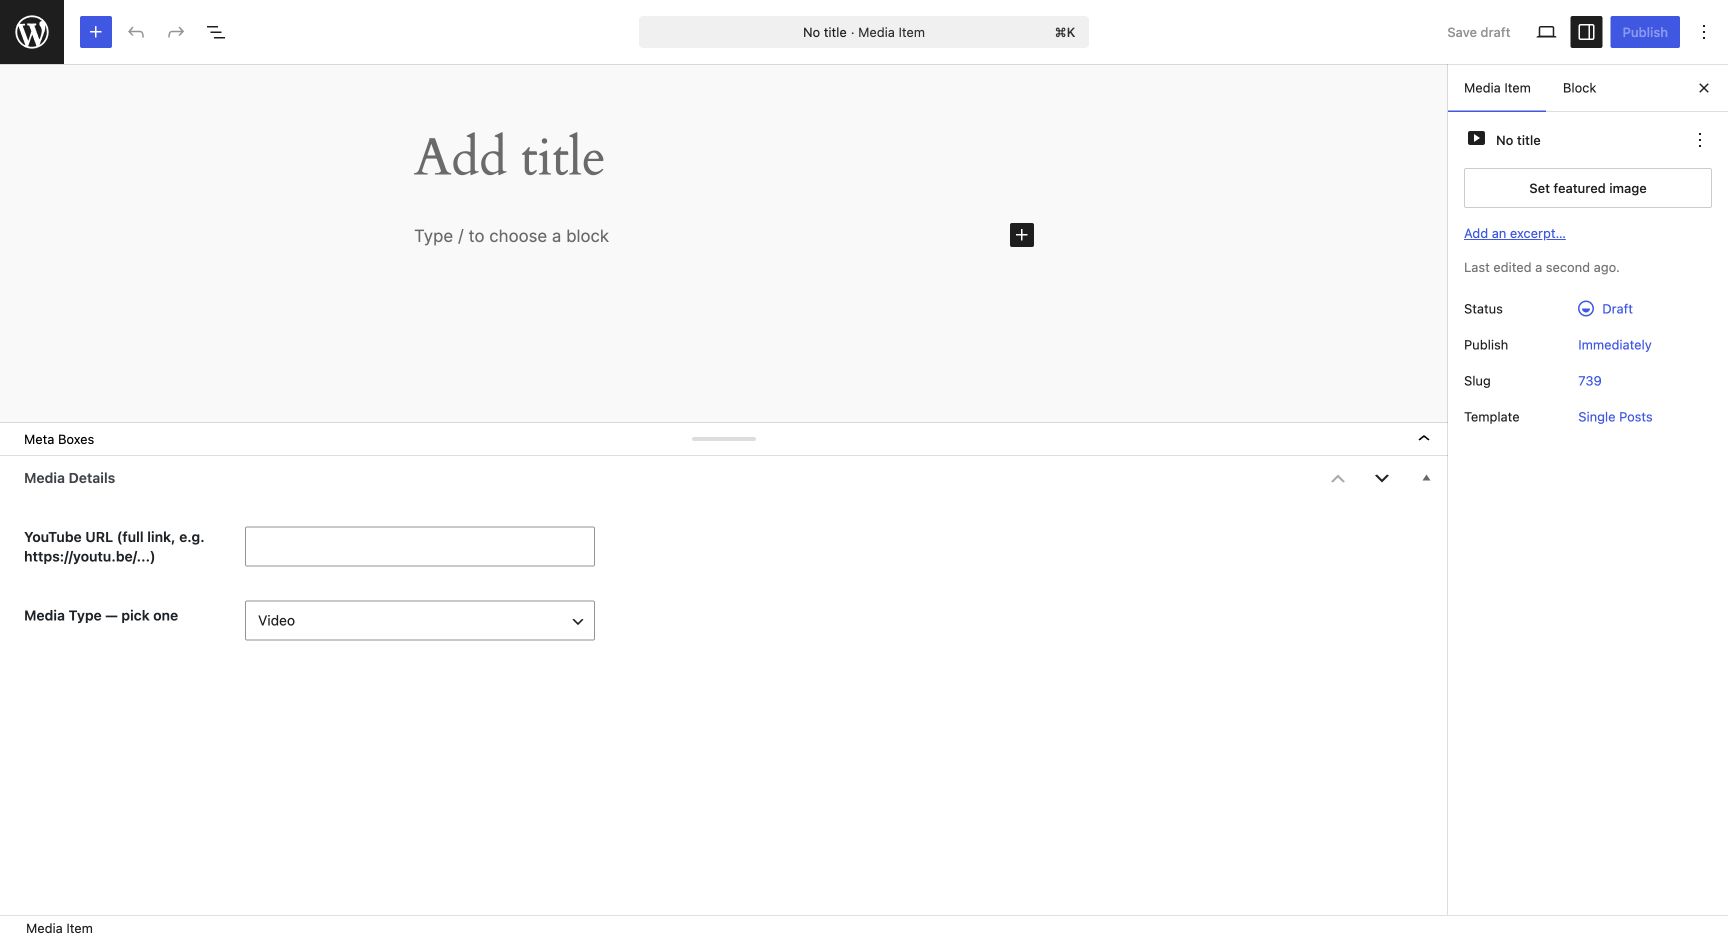
WordPress Media Item editor
6AUse Media Items—not the image/file Media Library—to create public Video, Press and Tour cards.
Completed Media Item fields with a YouTube URL and Media Type
6BComplete the YouTube URL, Media Type and card copy before publishing.
Published Media Item shown in the Tour filter on the public website
6CConfirm the item appears under the correct filter and opens the intended external video.
Why is the video thumbnail wrong or missing?
  • Confirm the URL is a genuine YouTube watch, short, embed or youtu.be link.
  • Open it directly and confirm the video still exists and is public.
  • Set a Featured Image as fallback if YouTube does not expose a thumbnail.
  • Update, refresh Our Media and test the card again.
↑ Back to top
07

Reviews

Reviews create testimonial cards on the Reviews archive. The cards intentionally do not link to individual Review pages.

Add a Review

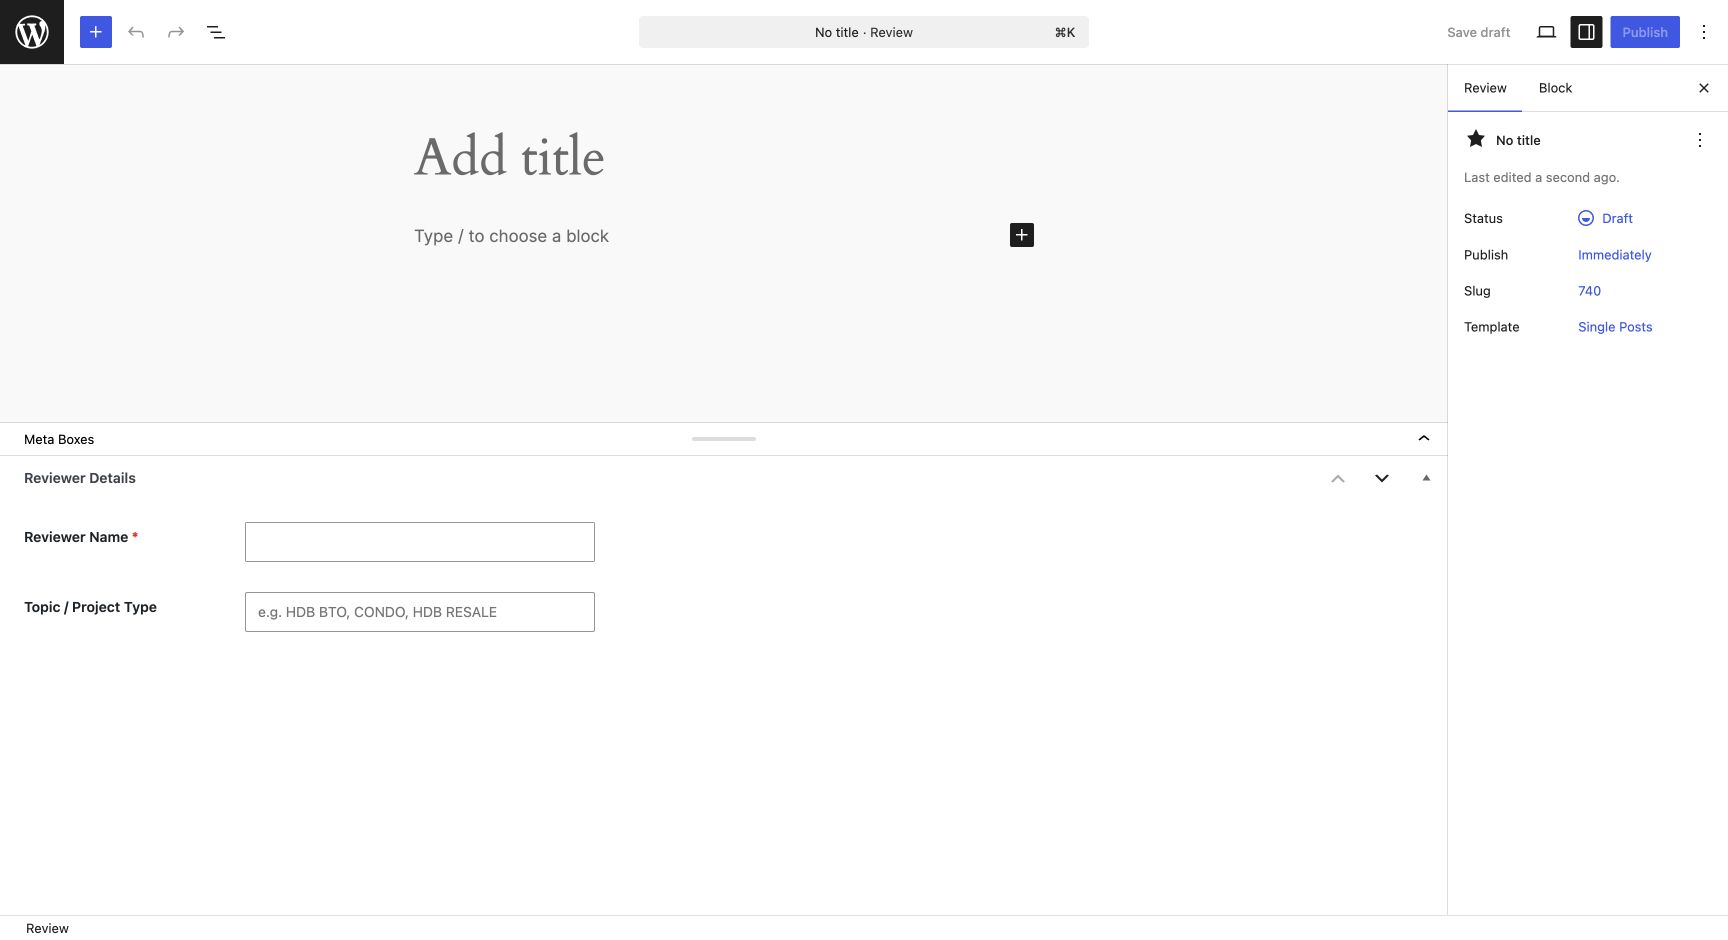
  1. Use a clear internal Title, for example Jane Tan Review. The public card displays Reviewer Name, not this Title.
  2. Paste the testimonial as plain prose in the main body editor. Remove email signatures, private contact details and accidental formatting.
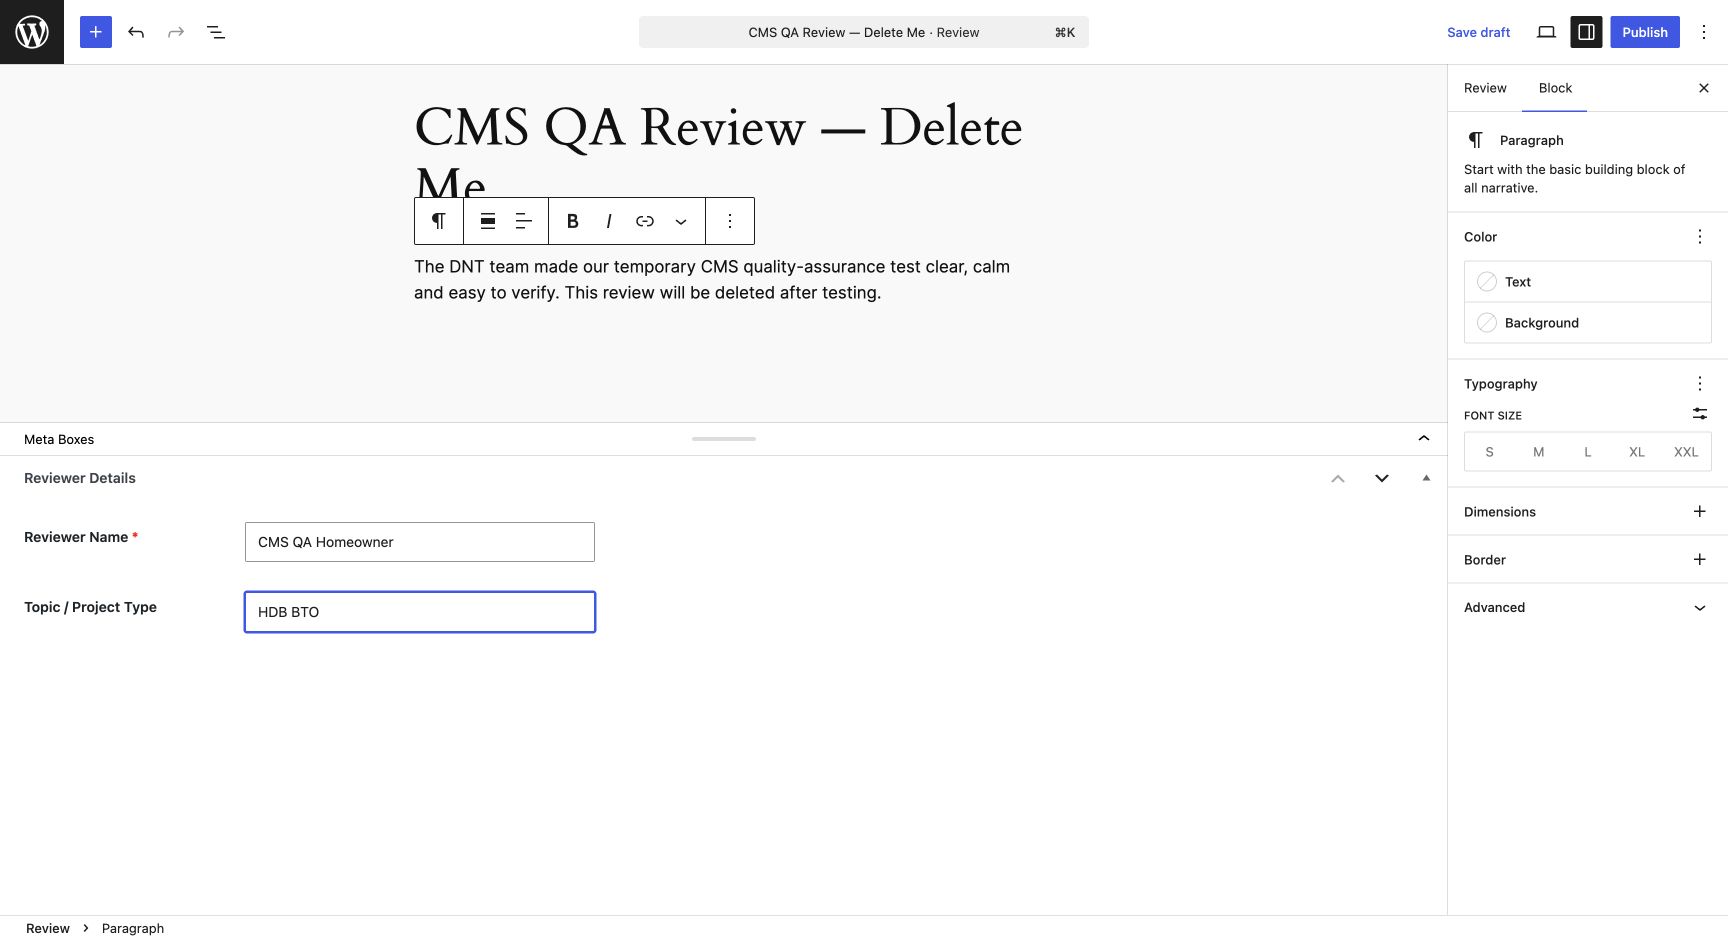
  3. Enter Reviewer Name. This field is required and becomes the public card name.
  4. Enter a consistent Topic / Project Type such as HDB BTO, HDB RESALE, CONDO, LANDED or COMMERCIAL.
  5. Preview, Publish, then verify the newest card on Reviews. Archive cards are intentionally not clickable.
i
Google reviews are managed in this same Review area

Verified five-star Google reviews use the actual reviewer name, the full written review as the body, and GOOGLE REVIEW as the Topic. Never create another Review post type. Use the numbered pagination at the bottom of Reviews to check older cards after a large import.

i
Homepage testimonials are curated separately

Publishing a Review updates the Reviews archive only. It does not automatically insert the Review into the homepage Client Stories marquee.

WordPress Review editor
7AAdd the internal title and testimonial in the Review editor.
Completed Review fields showing Reviewer Name and Topic
7BSet the public Reviewer Name and a consistent Topic / Project Type.
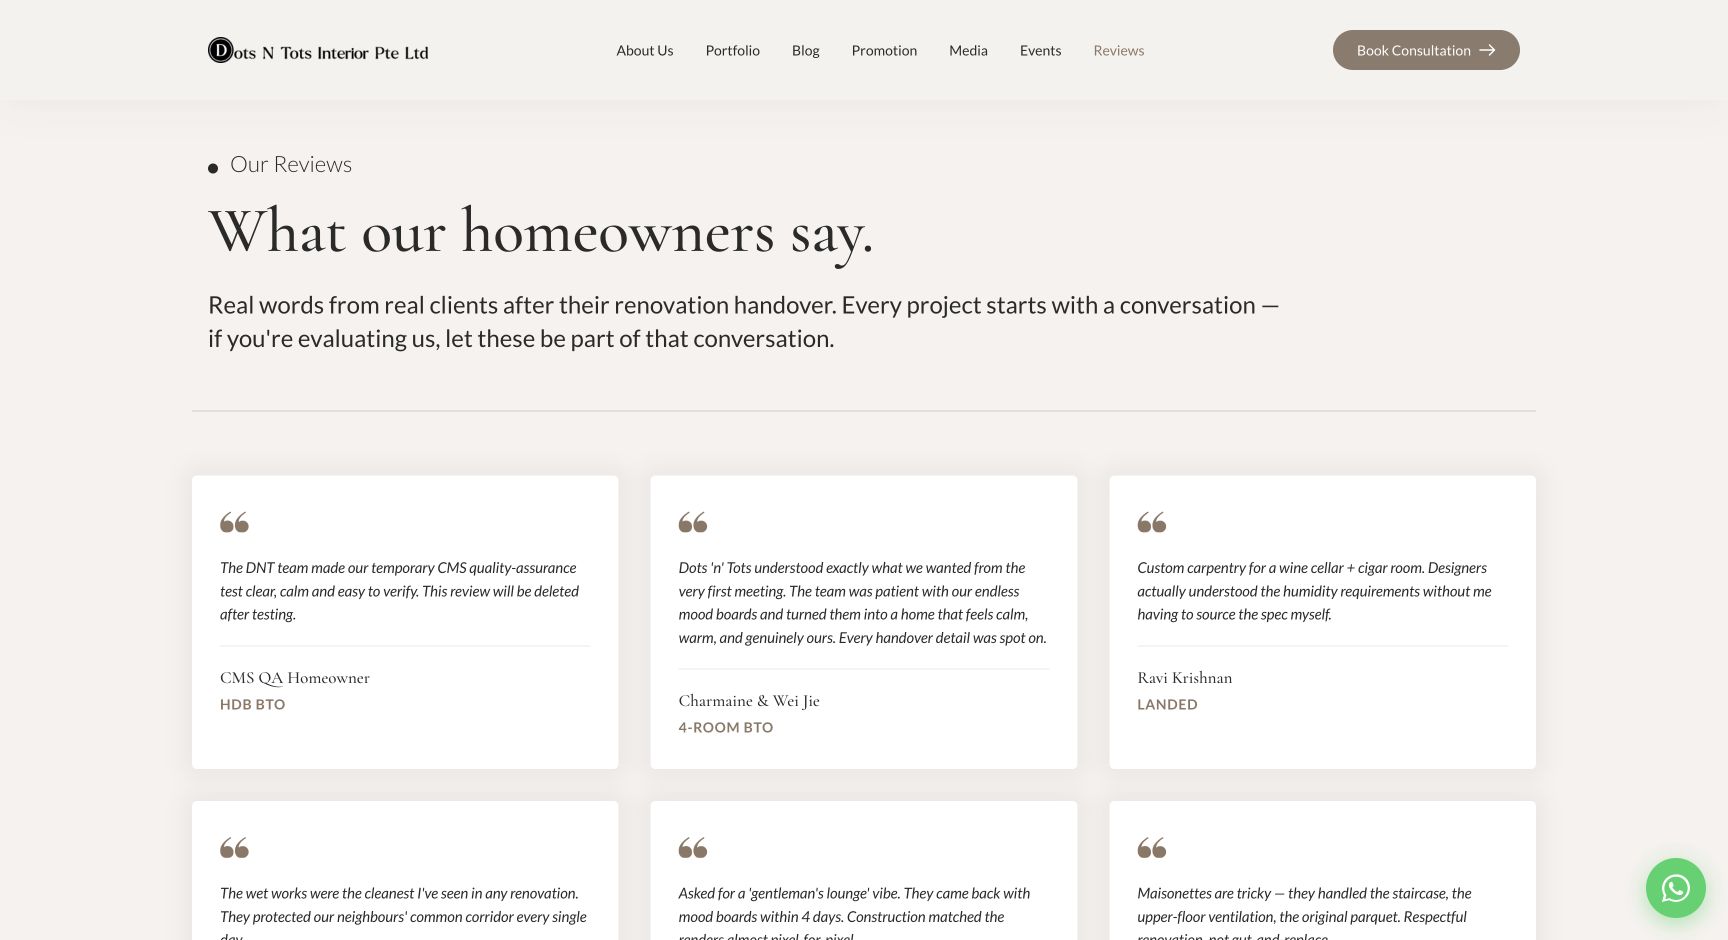
Published Review card on the public Reviews archive
7CVerify the testimonial card publicly; Review cards are intentionally not clickable.
Which fields have no effect on Review cards?

Featured Image, Excerpt, Categories and Tags are not used by the designed Reviews archive. Focus on Title, body testimonial, Reviewer Name and Topic.

↑ Back to top
08

Promotions

Promotions create offer cards and designed offer pages. Dates are display text only; publishing and expiry are managed manually.

Add or update an offer

  1. Enter the offer Title and detailed terms in the main body editor.
  2. Begin the main body with a concise summary because the archive description is generated from the body. Set a Featured Image for the Promotion detail page.
  3. Complete Chip Label, Subtitle, Period Start and Period End. Use one date format consistently.
  4. Set CTA URL. Internal links can use a root-relative path such as /contact/; external links must be full HTTPS URLs.
  5. Preview, Publish, then verify both archive card and designed Promotion detail page.
FieldUseImportant behavior
Chip LabelShort status or offer type.Appears on archive and detail.
CTA URLDetail-page button destination.Blank falls back to Contact; archive “View offer” always opens Promotion detail.
Period Start / EndDisplay-only offer dates.No automatic start, expiry or scheduling.
SubtitleOne-line offer explanation.Used on detail and description, not archive card.
!
Expired offers stay live until a person changes them

When one ends, change it to Draft or Move to Trash. Updating Period End does not unpublish it. New Promotions also appear at the bottom because the archive currently uses oldest-created first.

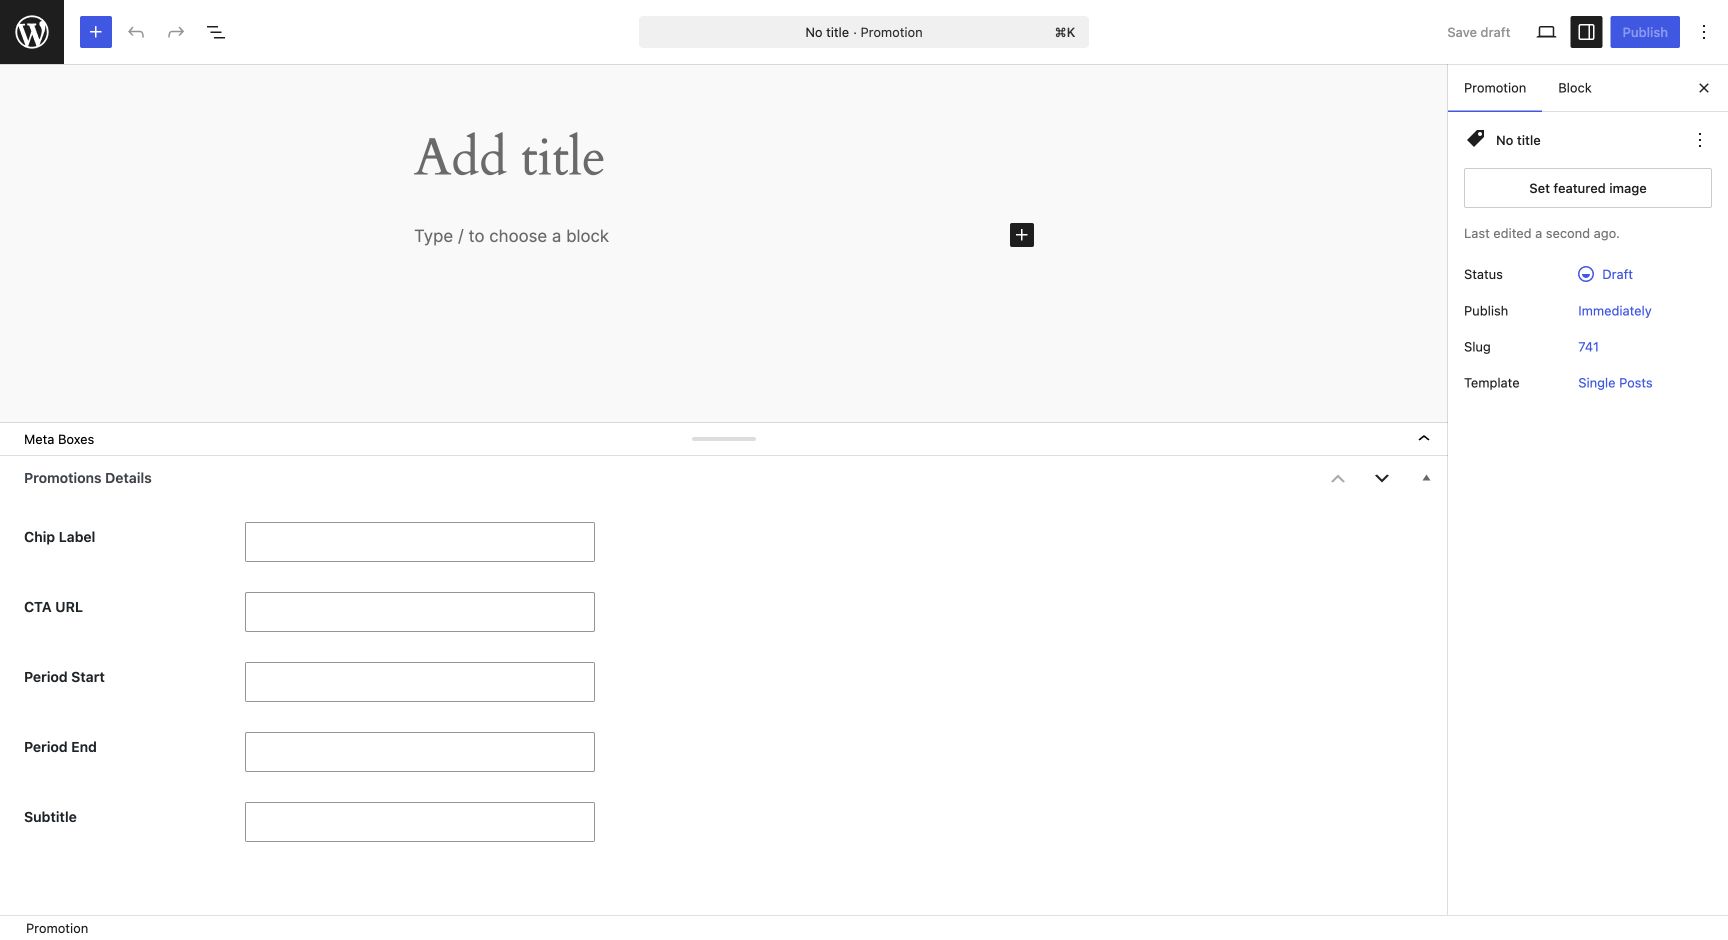
WordPress Promotion editor
8AAdd the offer title and terms in the Promotion editor.
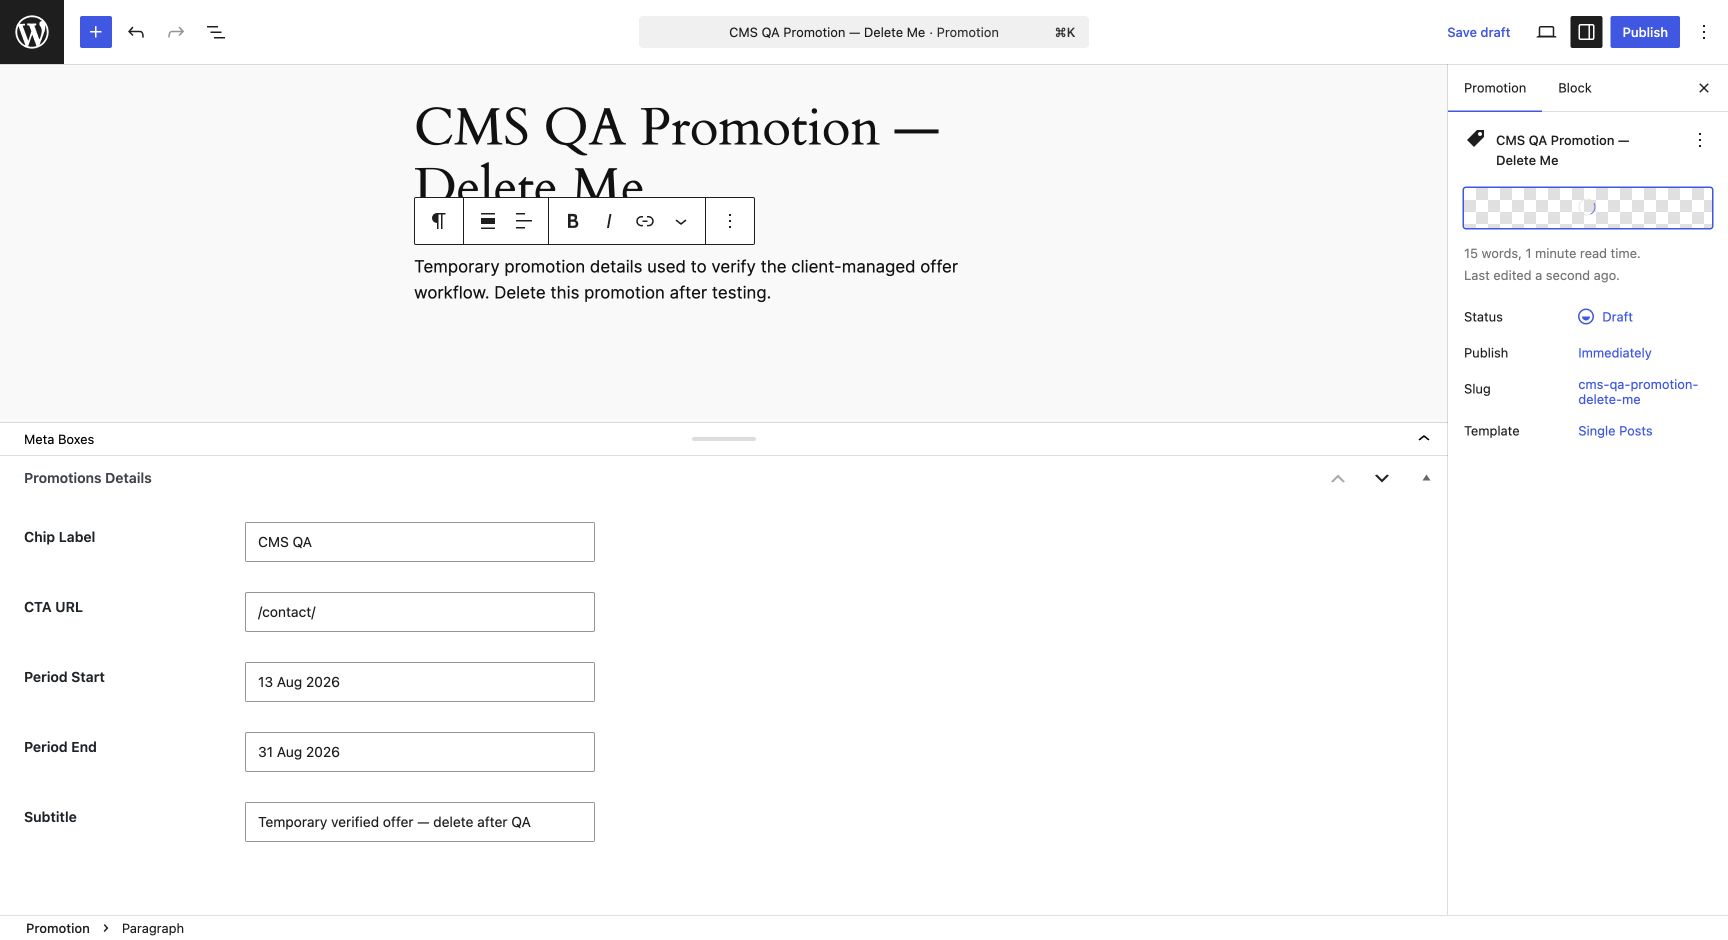
Completed Promotion fields and featured image
8BComplete the chip, CTA, display dates, subtitle and Featured Image.
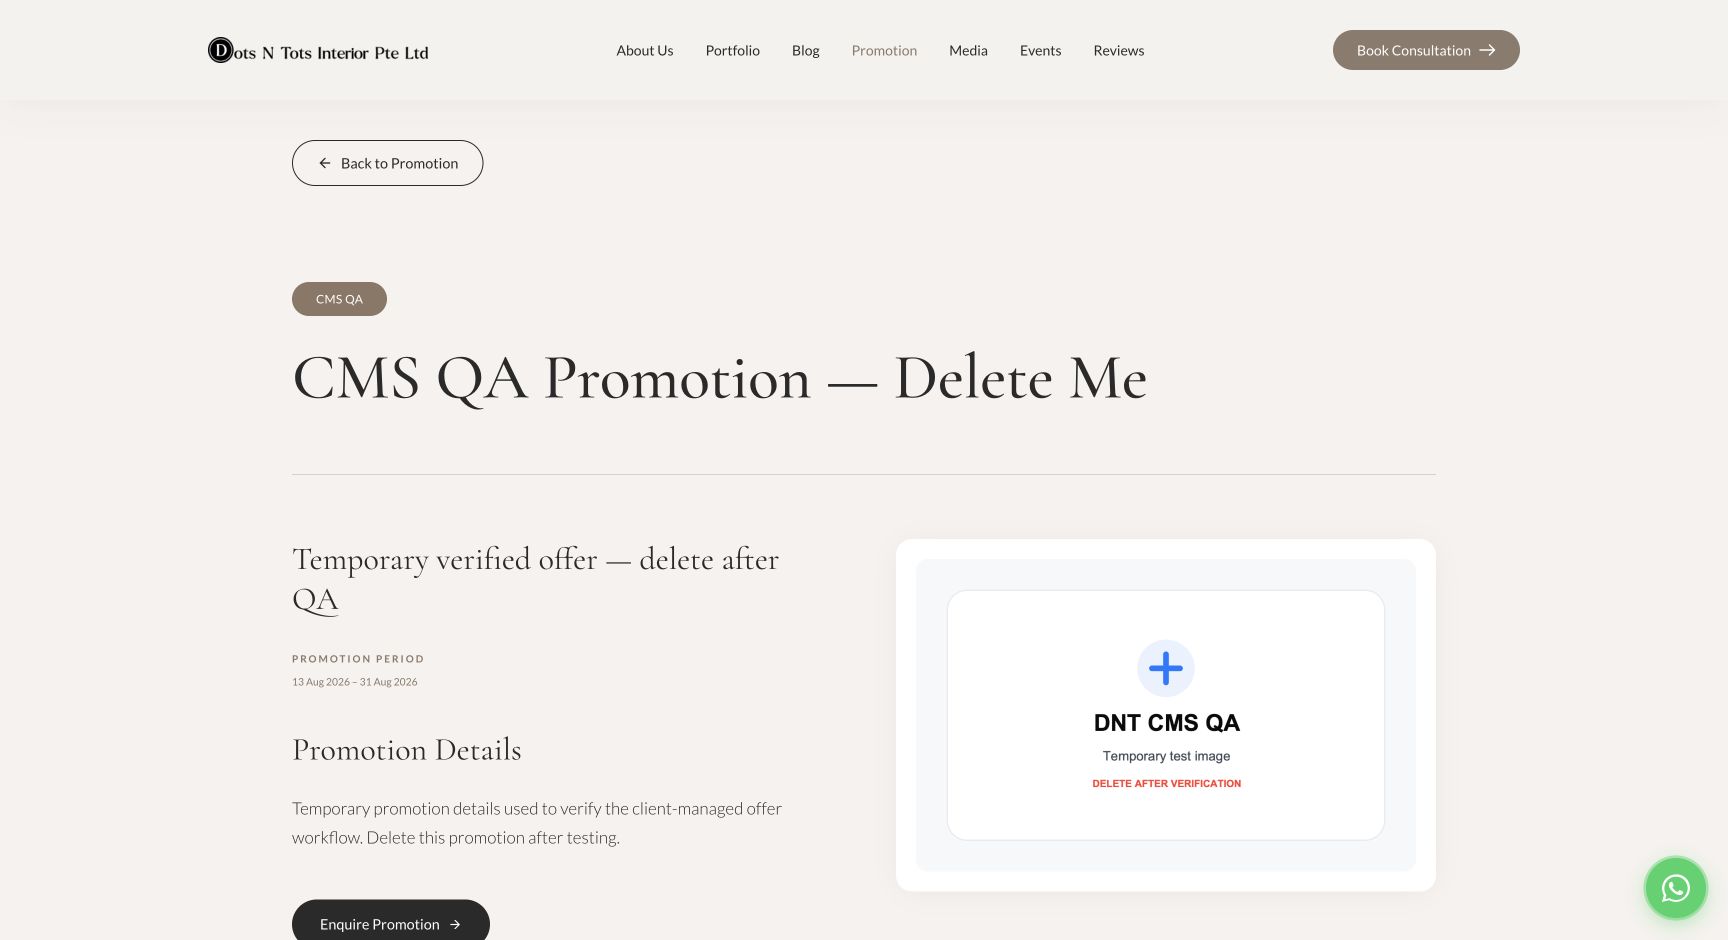
Published Promotion displayed on the public website
8CVerify the archive card, designed offer page and CTA destination.
↑ Back to top
09

Media Library

The Media Library stores reusable images and files. Uploading a file does not automatically place it on any page or content item.

Safe image workflow

  1. Prepare the final image before upload. Use a descriptive filename and avoid screenshots containing private notifications or personal data.
  2. Upload through Media → Add New, then add meaningful Alt Text describing the image for accessibility.
  3. Return to the content item. Choose the image as Featured Image or add it to Project Gallery—these are separate actions.
  4. Preview and inspect crop, clarity and gallery order on the public page.
Featured Image

Card and hero image

Chosen once per post/project. It is not automatically the first gallery image.

Project Gallery

Ordered image collection

Removing an image from a gallery does not delete it from the Media Library.

×
Do not permanently delete a file unless its usage is known

An attachment can be reused across Home, project galleries, Posts, Events and Promotions. Permanent deletion can break every reference. Removing it from one gallery is safer.

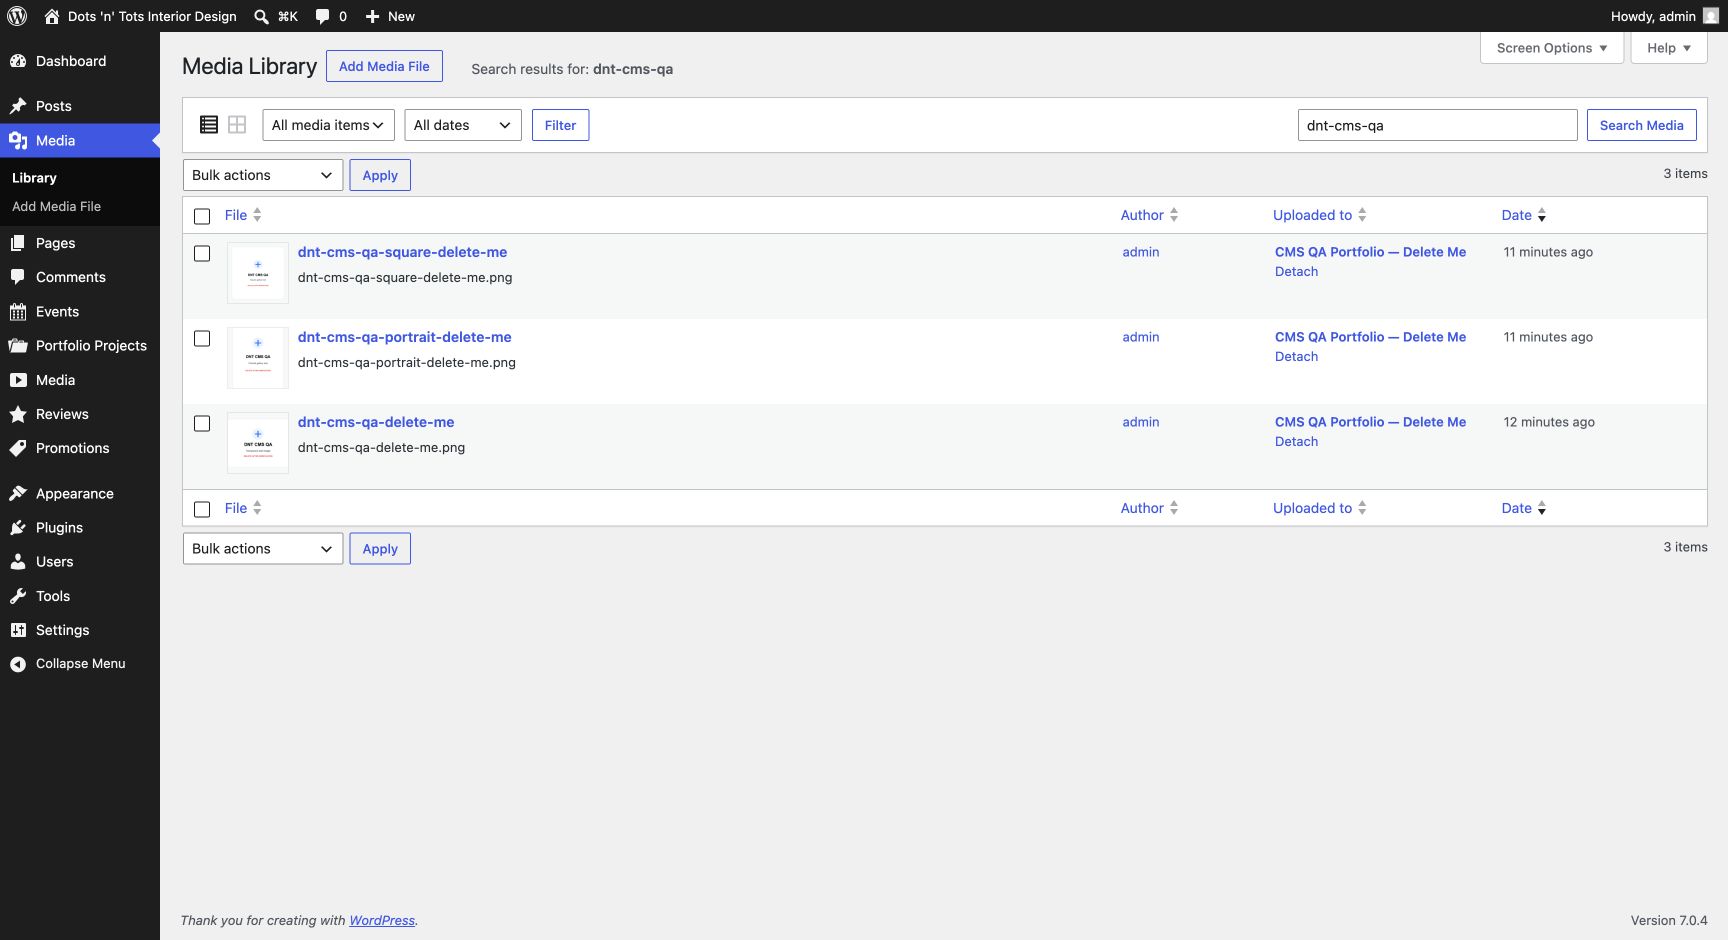
WordPress Media Library showing uploaded website images
9AUse the Media Library to review filenames, attachment details and Alt Text before reusing an image.
Image does not appear after upload
  • Confirm the upload completed and the file opens in Media Library.
  • Confirm it was selected as Featured Image or added to the correct gallery—not merely uploaded.
  • Choose Update after attaching it.
  • Refresh the public page once. If the wrong image remains, request support.
↑ Back to top
10

Pages & the curated homepage

The main Pages are managed deployments. The normal WordPress Page editor is not the source of their visible design.

×
Do not edit the designed Pages in the normal block editor

Home, About, Contact and other managed Pages use isolated Reputifly deployments. Normal body edits may do nothing or create an unstyled page. Navigation and page-design changes remain developer-managed.

What updates automatically?

ActionArchive/detail update?Homepage update?
Publish Portfolio ProjectYes: Portfolio archive and project page.No: project cards are curated.
Publish Blog PostYes: Blog and article page.No: Journal cards are curated.
Publish ReviewYes: Reviews archive.No: Client Stories are curated.
Publish Event / Media / PromotionYes: its own archive/detail behavior.No unless a developer places it.

Requesting a homepage or navigation update

Send the developer the exact public item link, section name, what should be replaced and desired order. For example: “On Home → Journal, replace card 3 with [article URL]. Keep the current design and order.”

Good update request
Section: Home → Our Portfolio Replace: card 4 With: /portfolio/project-slug/ Keep: current image crop, card design and mobile order
i
Why the homepage stays curated

The composition uses a deliberate card count, order and testimonial sequence. Automatically inserting the newest item would change that design, so new content is not pulled into Home without explicit selection.

↑ Back to top
11

Troubleshooting

Check status, practical fields and the correct public location before changing anything else.

My new item does not appear publicly
  1. Confirm Status is Published, not Draft, Pending, Private or Trash.
  2. Confirm you are viewing the correct archive: Portfolio, Events, Media, Reviews, Promotions or Blog.
  3. Check pagination. Archives show a limited number per page.
  4. Check ordering: most are newest publish date first; Promotions are oldest-created first and Events sort by Event Date.
  5. Refresh once. If still absent, send support the admin edit link and expected public location.
The item opens a 404 page
  • A Draft or trashed item correctly returns 404 to public visitors.
  • Confirm it is Published and copy its permalink from WordPress again.
  • Media Items and Reviews are not intended to use designed singles. Share Our Media or Reviews instead.
A Portfolio filter is missing

Confirm the comma-separated Tags spelling and capitalisation. New Tag text becomes searchable but does not create a visible chip. Send the desired chip and at least one project link to the developer.

A Blog Category filter is missing

A non-empty Blog Category should create a filter automatically. Confirm at least one Published Post uses it, that it is not Uncategorized, and that you are viewing page one of Blog. Refresh once.

An Event appears under the wrong heading

Check Event Date. Upcoming/Past is calculated from that field using Singapore time—not the WordPress publish date. Correct it, Update and verify Events again.

An expired Promotion is still visible

This is expected because Period Start and End are display text. Change the Promotion to Draft or Move to Trash, then verify the archive. Do not permanently delete it if the record may be needed.

How to remove and restore content safely
  1. Choose Move to Trash. This removes it publicly but keeps recovery possible.
  2. Open the content list, choose Trash, locate the exact item and choose Restore.
  3. Restored content may return as Draft. Open it and Publish only after checking.
  4. Do not choose Delete Permanently during routine content management.
!
When requesting support

Send the exact admin edit link, public URL, screenshot, device/browser and expected result. Never send passwords, one-time codes or private customer information.

↑ Back to top
12

Before you publish

Use this final check every time. Selections stay only in this browser and are not submitted anywhere.

That is the complete client-managed workflow

Content is managed in WordPress; design, templates, navigation, permanent Portfolio filter chips and curated homepage placements stay developer-managed.
↑ Back to top